I give to you these UNREAL Dark Chocolate Gem Cookies that are completely vegan and totally amazing!! Taking one of my new favorite on-the-go snacks and using them as a chocolate chip replacement was the best idea ever. These cookies have the perfect sweet and salty kick that will cure any sweet tooth. Be sure to keep an eye out for my vegan chocolate peanut butter cheesecake garnished with the @unreal.snack Crispy Dark Chocolate Peanut Butter Cup.
How fun are these Plant-Based St. Paddy’s Day Shamrock Shakes! In honor of Lactose Intolerance Awareness Month in February and it being a green holiday, I thought why not share one of my favorite beverages – milkshakes! In partnership with Vitacost, I bring you this organic and non-GMO oat milk by Pacific Foods, which is completely natural. That’s right- 100% natural and the perfect dairy-free alternative! It’s a good source of Calcium and Vitamin D, promotes heart health, and sweetened with oats. I enjoy drinking this oat milk by the glass, in baking, and my recipes!
I don’t know about you but cookie dough bites and a good movie with popcorn are my go-to choices. I’ve created with my friends at EatPastry these fun bite-sized cookie dough bites with their non-GMO, vegan, egg and dairy free cookie dough. It’s super convenient if you are looking for some quick homemade cookies at home. Using the dough to create other favorite indulgent treats is the perfect way to be creative. Feel free to give this recipe a try, they sell at Whole Foods and other locations, which you can search for on their site.
Yields 20-25 cookie dough bites
Ingredients
1 tub eatpastry cookie dough
1 cup chocolate chips of choice
3-4 Tbsp. coconut oil or plant-based butter
Coarse rock salt, to garnish (optional)
Directions
Using a 1/4 tsp., scoop the dough into small rounds and set onto a parchment lined baking sheeted.
Place into the freezer until they are semi frozen, roughly 20-25 minutes.
In a glass bowl, add chocolate and coconut oil.
Bring a sauce pot filled a quarter of the way with water to a simmer. Place the glass bowl on top and melt chocolate until smooth, stirring occasionally. Remove from heat.
Take the cookie dough bites out of the freezer and dip them into the chocolate and place back onto the baking sheet.
Place in the refrigerator until chocolate sets, roughly 30 minutes.
Serve as a snack or on top of ice cream.
Chef’s tip: These can be kept in the fridge for up to a week.
Store bought truffles are good, but homemade truffles are even better. This Valentines Day, I highly suggest making one of these: Chocolate Truffle, Espresso Truffle, or a Raspberry Truffle. Your family or special someone will love you even more for showing up with these amazing and rich treats, which is why I highly recommend giving these a try. Whether you like plain chocolate, coffee or raspberry, I’ve got you covered with my simple ganache recipe for wonderful truffles (that look store bought!) Whose ready to start melting some chocolate?
Chocolate Truffle Base
Yields 8 truffles
Ingredients
1 cup chocolate (60-70% cocoa)
1/2 cup heavy coconut cream, well mixed
2 tsp. vanilla extract
1/2 cup cocoa powder, to roll in
Directions
In a heat proof bowl, add the chocolate. Warm the cream up on the stove for 3-5 minutes on medium-high heat.
Pour cream over chocolate and whisk until combined. Pour into a parchment lined pan and place into the refrigerator for 1-2 hours or until it is scoop-able.
Remove from the fridge and quickly scoop an even amount into your hand, roll into a ball, dust with cacao powder, and place in the fridge until ready to serve.
Cake: A spongy-flavorful dessert that we get to treat ourselves with during the holidays, gatherings, and of course- Birthdays! We all have our go-to cake or cupcake, and this Almond Cake with a Vanilla Meringue Buttercream is surely mine. To make the imaged cake, you will need to double this recipe and if you are looking to make two 8-inch rounds, this cake is perfect for that too! Even though I baked this cake without the use of diary and eggs, it is still moist, spongy, and does the job. What’s better than an organic cake made by yourself in the comfort of your own home? I hope that this recipe brings you, your family and friends a lot of good memories and birthday cheer!
Yields 45 servings for 6 and 7-inch or 60 servings 6,7, and 8-inch cakes
In a stand mixer, beat together the sugar and oil until light in color. Add the almond extract and buttermilk.
In a separate bowl, sift together the flour, baking soda and powder. Add the salt and combine the flour mixture to the wet ingredients, a little bit at a time.
Beat until flour is well combined and cake batter consistency is achieved.
Cut out parchment rounds to fit the bottom of the cake pans. Be sure to grease the parchment also, this will help your cakes not stick.
Using two 8-inch round cake pan, distribute the batter between the two as listed below. If you are using a 6 and 8-inch pan for a 3 tier cake, you will need to triple the recipe and fill the cake pans up as provided below:
6-inch: 350 degrees F for 35-40 minutes; 3 cups batter 7-inch: 350 degrees F for 40-42 minutes; 4 cups batter, optional 8-inch: 350 degrees F for 40-45 minutes; 5 cups batter
Bake cakes for 40-45 minutes (rotating half way through) or until a toothpick comes out clean and cake edges are slightly browned and pulls away from pan.
Place onto a wire rack to cool until bottom of the pan is cool to touch.
Flip the cakes out of the pan onto the rack and allow to completely cool (roughly 1-1/2 hours).
Using a knife, level the cakes so they are all even. Slice cakes in half, wrap in plastic individually, and place in fridge or freezer until ready to frost or leave out if you are making it that day.
Aquafaba Concentrate:
In sauce pan over medium-high heat, pour in both cans chickpea liquid AKA aquafaba (save chickpeas for my hummus recipe). Reduce liquid until 1 cup remains. Pour liquid into container and cool in refrigerator overnight (this step is very important).
MeringueButtercream:
In your Kitchen-aid standing mixer, whip the concentrated chickpea liquid for 10-15 minutes until a medium peak has formed.
In the meantime, melt the sugar and water in a medium sauce pan on high-heat, 2-3 minutes. Once rolling boil starts, remove from heat and pour into the mixer with chickpea liquid. Make sure to turn the speed down when pouring.
Turn the speed back up to high and whip together for another 8 minutes until meringue -like consistency forms.
Once completely cool, add the butter and shortening slowly a little bit at a time until completely mixed. If for any reason it separates, place more fat into the meringue. If it still doesn’t hold, place in the fridge for a couple minutes and re mix or heat the bowl if it appears “curdled”.
Add the vanilla and give a good mix. Once frosting has thickened and is a good consistency, you are ready to frost the cake.
Assembling:
Smear a small amount of frosting on the bottom your cake boards and place the leveled cake on it.
Place one 8-inch round layer down on the plate and add 2 ice cream scoops of the meringue buttercream in a smooth layer. Place the other 8-inch layer on top and use more meringue buttercream. Coat the outside as well for a crumb coat (light layer of frosting to keep crumbs from showing up in the final frosting layer). Place into the fridge to chill while you do the same process with the 6-inch round cakes.
Remove from fridge and add buttercream to the outside of the cakes for a final coat.
Put three wooden dowels into the bottom layer. Put the 6-inch cake on top and put another wooden dowel in the middle, smearing frosting to cover the hole. Frost the gaps and cracks once you are finished securing the cake.
Top with choice of fruit, frosting design, sprinkles, or any other toppings you’d like.
Chef’s tip: If you would like to make a three tiered cake, you will need to triple the recipe.
This Matcha Ice Cream recipe is both creamy and has a great umami taste. Ice cream usually consists of dairy, sugar, and eggs but this plant-based version uses none. When you think of cold tasty creations, matcha green tea can be a unique alternative! A little background, this tea dates back roughly 900 years when Bhuddist monks brought it to Japan. It is known for its superfood health benefits, having lots of antioxidants, helps regulate the immune system, and detoxify your body. How cool is all of that in your ice cream! Desserts can still be delicious, healthy, and satisfying while living a vegan life.
Place your ice cream bowl into the freezer overnight.
In a Vitamix blender, place all ingredients in and blend until well combined.
Pour into a mason jar and put into the fridge while you wait for your ice cream bowl to freeze overnight.
Once ready, pour your mix into the ice cream maker and set until soft serve ice cream forms. Put into freezer for 1-2 hours to allow to firm up.
Serve with whipped cream or toppings of choice.
Chef’s tip: If you don’t have an ice cream maker, place the mixture into a metal bowl and into the freezer. Give it a stir every 45 minutes or so until you achieve your desired consistency. Can take up to 2 hours this way but works just as well.
This is the best Pecan Cookie recipe ever! Everyone needs a good cookie recipe in their life, and this is defiantly mine. Personally, I love a cookie that is both chewy and crispy, and this is both of those. Pecans usually are underrated in my opinion and don’t get used all that much. The crisp buttery cookie baked with the pecan nuts make for a real special treat, which is why I think they are perfect! For a little added bonus, roll the cookies into rounds the night or day before and place them into the freezer. This way you can pop out a coupe at a time without the need to bake them all at once.
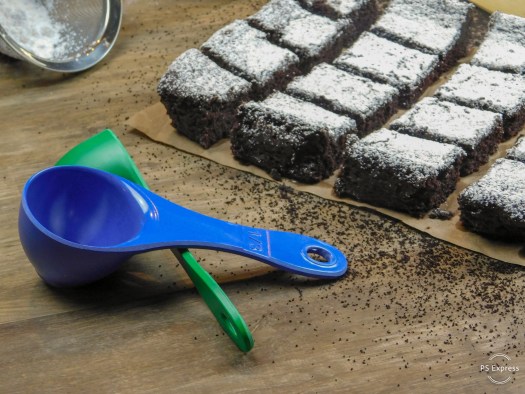
Why yes, a Chocolate-Espresso Brownie does sound like an amazingly delicious treat! These cake-like brownies are dusted in powdered sugar with just the right amount of chocolate and espresso flavor. Without the use of eggs, “real” butter, and dairy, you are still able to get the perfect dessert. Dunk-able and stackable with ice cream and hot fudge, these brownies are universal in whichever way you’d like to enjoy! Feel free to add chopped walnuts or chocolate chips for some extra crunch or a warm gooey chocolate surprise.
I know what you are thinking, “these cookies are unbearable to look at without a taste”.. Id have to agree myself! In the spirit of giving this holiday season my good friend shared her spiced polar bear cookies with me, so I wanted to share my plant based rendition of her famous cookie with you all. Slightly dusted with powdered sugar and finished with chocolate chips and a red hot candy, this fun recipe is perfect for any snow day or even rainy day.
chocolate chips for the eyes, mini if doing smaller cookies
red hot candies for the nose
Directions
In a KitchenAid stand mixer, cream together the sugars and butter for 2-3 minutes.
Next, add the egg replacer, vanilla, spices, salt, and mix until combined. Sift the flour into the mixture until the dough forms. Wrap the dough and place into the refrigerator for 1 hour.
Preheat oven to 350 degrees F.
Remove the dough from the fridge and make (48) 1-inch balls and (144) 1/4-inch balls for the ears and nose, flattening slightly.
Take a tablespoon to make even spheres for the face and a 1/4 teaspoon for the ears and nose. Line a baking sheet with parchment paper and place the cookies on.
Bake for 11-15 minutes, or until set (not browned, roughly 12 minutes).
Remove from oven and directly dust in powder sugar completely, pressing the chocolate chips carefully for the eyes and the red hot for the nose quickly.
Allow to cool in the fridge so the chocolate and powder sugar do not melt.
Serve with hot chocolate or coffee.
Chef’s tip: Instead of cardamom, you could use cloves instead.
Growing up, I have always had a sweet tooth for sugary treats. As I’ve gotten older my taste buds want something more! The earthy undertones of the tea mixed together with the sweet vanilla makes for a subtle but irresistible flavor combination. Interesting fact about these cookies, the tea acts as a natural food dye so these delicious treats are even healthier than they look!


You must be logged in to post a comment.