fbpx

Mexican-Style Stuffed Peppers

Mexican-Style Stuffed Peppers

Mexican-Style Stuffed Peppers

Did someone say fiesta? Mexican stuffed peppers are a vibrant and fun way to add a little kick to any dinner. Normally a taco night is filled with lots of beef and taco shells (or tortillas) and not so much veggies! With this recipe, you will get the same flavor just in a healthier way. The best part about this option is if you are wanting to wrap it up in a burrito style-fashion, you can totally cut it up and do that too. This recipe is truly universal and a great alternative to any taco night fiesta!

Mexican-Style Stuffed Peppers

Yields 4 stuffed peppers

Ingredients

4 bell peppers

1 cup Vitacost Black Beans – Non- GMO and Gluten Free

2 cup cooked Vitacost Certified Organic Quinoa – Non-GMO

1 large vine tomatoes, diced

1 medium onion, diced

1/2 cup fresh corn

1 garlic clove

1 Tbsp fresh. cilantro

2 tsp. Vitacost Certified Organic Ground Cumin

1 Tbsp. Badia Chili Powder


Directions

  1. In a frying pan, on medium- heat olive oil with onions and garlic until transparent. Remove from heat and set aside.
  2. In a bowl, mix together your black beans, diced tomato’s, sautéed onion and garlic, corn, cumin, chili powder, cilantro, and quinoa.
  3. Add mixture evenly to the insides of the bell peppers. Place into oven and cook for 20 minutes or until browning on outside of peppers.
  4. Serve warm with guacamole and salsa on the side or with an Ancho Chili sauce.


Chef’s tip: You can add the tomatoes inside of the stuffed peppers or you can just add salsa to the top with guacamole once cooked.


Apple Sauce

Photo Cred: Jermaine Bullard

Ever wonder how it would be to take a bunch of apples and make your own apple sauce with out all that added sugar and preservatives? Well it’s a good thing you found yourself to this recipe because you are in for a real treat. Not only will your taste buds be exploding from the flavor but your house will be filled with an apple cinnamon flavor. It may just have your neighbors knocking on your door so be careful, it is that good.

Photo Cred: Jermaine Bullard

Yields 16 oz

Ingredients

8 apples, peeled, decoded, and sliced

1 1/2 cup filtered water

1/2 cup Florida Crystals Organic Cane Sugar

1 tsp. Vitacost organic ground cinnamon


Directions

  1. In a large stock pot, add chopped apples (peeled and de-cored), sugar, water, and cinnamon. Bring pot to high heat and boil for 15-20 minutes.
  2. In a blender or using a hand held masher, smash apples.
  3. Pour into a mason jar and allow to cool before lidding and placing in the refrigerator.


Chef’s tip: Substitute 1/4 cup applesauce in place of (1) egg for any baking recipe.

Rhino’s Pumpkin Roll

Pumpkin Roll

Pumpkin Roll

Have you ever tried making a thin pumpkin cake, only to later roll it around in a white plant-based cream cheese filling and topped with dusted powdered sugar? If you haven’t then you are in for a real treat! This simple pumpkin roll will not only wow all of your family and friends, but you will surely impress yourself with this restaurant-style dessert made in the comfort of your own home. The best part about any Swiss roll cake is that you can keep it in the freezer for any surprise guests that drop by or you can take it to a gathering or give it as a tasty gift during the holiday season. This recipe is so good that you may need to make two at a time!
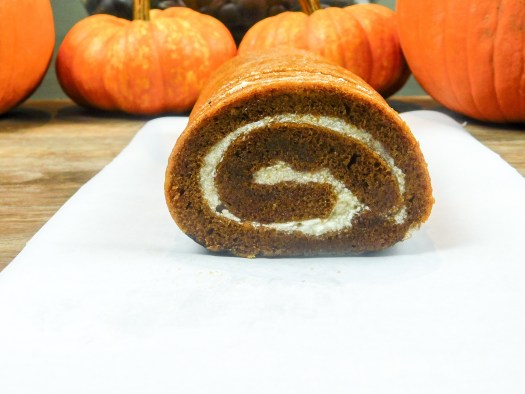
Pumpkin RollPumpkin Roll

Yields 1 cake; around 10 slices

Ingredients

Cake:

1 cup granulated sugar

4 Tbsp. Bob’s Red Mill Egg Replacer + 8 Tbsp. Water, (in 2 batches)

1 cup homemade pumpkin purée

1 cup King Arthur all-purpose organic flour

1 tsp. baking powder

1/2 tsp. Vitacost ground cinnamon

1 Tbsp. pumpkin spice seasoning

1/2 tsp. Vitacost Fine Himalayan Pink Salt

1/8 cup Vitacost powder sugar, for dusting

1 cup walnuts, chopped (optional)

Cream cheese frosting:

4 Tbsp. Earth Balance Vegan Buttery Sticks, room temperature

8 oz. Kite Hill Cream Cheese

1 cup Vitacost powdered sugar

1 Tbsp. Vitacost pure maple syrup

Directions

Cake:

  1. Preheat oven to 375 degrees F.
  2. Line a baking sheet with parchment paper and lightly grease with cooking spray or vegan butter.
  3. In a stand mixer, beat the already combined egg replacer and water with the sugar for 1-2 minutes or until it thickens. Add the pumpkin puree; mix till combined.
  4. Add the flour, baking soda, cinnamon, pumpkin spice, salt, and baking powder into the batter. Mix together until flour is combined and switch to using a spatula. This way you can get a few more stirs in without over mixing the batter.
  5. Pour the batter onto the 10×15 baking sheet and bake for 15-17 minutes or until the cake springs back after you touch it. Prepare your dish towel while it bakes by dusting it heavily with powdered sugar. This will prevent the cake from sticking.
  6. Once the cake springs back after toughing it, remove it from the oven and immediately (and carefully) flip the cake pan on top of the towel and remove the parchment paper slowly (there will be a massive cloud of powder sugar so prepare yourself).
  7. Begin to roll the towel with the cake into a log shape and allow to cool on a cooling rack until room temperature. Make sure that you do not let the cake cool for more than an hour, or it can cause the cake to crack when you go to unroll it.

Buttercream:

  1. In a mixing bowl, beat the butter and cream cheese for 2-3 minutes on a medium speed until well combined.
  2. Then add the powdered sugar and maple syrup (or flavoring) and mix; set aside.

Pumpkin Roll

Assembly:

  1. Carefully unroll the log and spread the frosting in a single layer. Cover the frosting with the walnuts at this time (optional).
  2. Re-roll the cake back up into a log shape..
  3. Place into the refrigerator for 1-2 hours to allow cake and frosting to firm up a bit (set overnight for best results).
  4. Remove from the fridge and dust top with powdered sugar.
  5. Serve and enjoy.

Chef’s tip: Move quickly when cooling this cake, or it will crack and break when you go to roll it. You can also use pecans instead of walnuts.

Breakfast Oats with Strawberries and Coconut

Breakfast Oats with Strawberries and Coconut

Breakfast Oats with Strawberries and Coconut

Did you know that you should normally eat and drink water within the first hour of waking up? This helps get your metabolism started for the day and gives you the fuel you need to begin your morning. With this quick and easy breakfast oat bowl, you will be eating in no time. Using organic and homemade ingredients, this bowl is packed with tons of nutrients! In a rush? Make these overnight and store in the refrigerator for a quick and easy grab-n-go meal!

Breakfast Oats with Strawberries and Coconut

Yields 1 serving

Ingredients

1-1/2 cup rolled oats, uncooked

16 oz fresh coconut milk

1/4 tsp. vanilla extract, optional

1 tsp agave, optional 

Sliced coconut meat to top

Sliced strawberries to top

Directions

  1. In a mason jar mix vanilla, agave, and coconut milk and set aside.
  2. In a bowl, pour in oats and top with coconut milk. Garnish with sliced strawberries and sliced coconut meat with a mint leaf.

Chef’s tip: Feel free to add almonds, walnuts, or granola for an extra crunch. 

Guacamole

This extremely simple guacamole will be gone as fast as it takes you to make it! Needing only a few ingredients to make, this Guacamole Recipe is a healthy dip that will leave you totally satisfied. This staple side dish makes its way onto countless tables each day and every taco Tuesday night. I recently was shown the hidden secret of adding a touch of oregano and cinnamon and I couldn’t wait to share it with you!

Yields 4 servings

Ingredients

3 avocado

1/2 tsp. cumin 

1/4 tsp. ground cinnamon 

1/2 tsp. oregano

1 clove of garlic, minced

1/2 tsp. Vitacost Himalayan Pink Salt 

1/4 tsp. Spicely Organics Black Ground Pepper

1 tsp. lime juice, fresh squeezed

Dash of smoked paprika 

Directions

  1. To prepare your avocado, slice lengthwise around the entire pit. Remove the halves and with the “butt” of the knife (the back end) smack the pit and make a twist motion with your hand once the knife is sturdy in the seed. Remove pit and toss.
  2. Remove flesh from avocado and place into a bowl. Mash with a fork and add the spices, lime juice, onion and tomato.
  3. Top with smoked paprika and serve.

Chef’s tip: Feel free to add diced onion, tomatoes, or cilantro if you’d like.

Butternut Squash Soup

Butternut Squash Soup

This is the perfect thick, creamy and rich soup that is packing a huge flavor punch. It is so simple that I created it when I was looking at a can of coconut cream and a fresh butternut squash, thinking to myself what can I do. Being able to create something from nothing is a super important quality to have. Its like the saying, “when life brings you lemons- make lemonade!” Only this time, when life gives you a handful of ingredients, create something delicious! With this simple and tasty way to use squash, it will be an a huge hit for your family or friends.

Butternut Squash Soup

Yields 4 servings

Ingredients 

1 butternut squash 

3 1/2 cups vegetable broth

1 Tbsp. avocado oil

1/4 cup onion

1/4 cup shallots

1 garlic clove

1 Tbsp. Earth’s Balance Vegan Buttery Sticks

1 tsp. Vitacost Himalayan Fine Pink Salt 

1 tsp. Vitacost organic brown sugar

1/8 tsp. nutmeg

Pinch of Spicely Organic Ground Black Pepper

1-2 Tbsp. Thai Coconut Cream, optional topping

1 Tbsp. fresh parsley, topping

Directions

  1. Preheat the oven to 425 degrees F. 
  2. On a baking sheet, place the two butternut squash halves you cut length-wise, flesh side up, and drizzle with olive oil. Sprinkle with salt and pepper and turn over so the skin is now facing up. Roast for 40-45 minutes until squash is tender. Set aside to cool.
  3. Once squash has cooled (around 8-10 minutes), remove the squash flesh from the peel and discard or compost the remains. 
  4. In a skillet, turn to medium heat and add olive oil, onions, and shallots- sauté for 2-3 minutes. Add the garlic and cook for another 2 minutes.
  5. In a medium sized pot, on medium heat add the butternut squash, brown sugar, vegetable broth, onions and shallots, garlic, salt, pepper, and nutmeg.
  6. Using a hand held emersion blender, purée all ingredients until smooth. Then pour in the coconut cream and stir until combined. Cook for 5-10 minutes to allow flavors to meld on medium-low heat. Be sure to stir frequently so it does not burn.
  7. Serve with parsley and coconut cream drizzled on top or freeze for up to 1 month.

Chef’s tip: To make soup more creamy, use 1-2 Tbsp. coconut cream more and blend.

Homemade Apple Crisp

Apple Crisp

Apple Crisp

Thinking back to this simple yet delicious dessert brings back memories of apple picking at Patterson’s Fruit Farms in Chesterland, Ohio. The warm apples mixed with cinnamon and a hint of nutmeg always pairs perfectly with a heaping scoop of cold vanilla ice cream. Pro Tip: For a crisp crunchy top, be sure to clump your oat mixture up in your hands before placing it on the apples. So get out to your local farm and pick up a bag of fresh apples so you can whip up this apple crisp!

Apple Crisp

Yields 10-12 servings

Ingredients

8-9 apples, peeled and cored

1 Tbsp. lemon juice

1/2 cup sugar

2 Tbsp. King Arthur organic flour

1/8 tsp. nutmeg

Topping:

1 1/4 cup King Arthur organic flour

1/2 cups whole rolled oats

3/4 cup butter, melted (about 10 Tbsp.)

1/2 cup brown sugar

1/2 tsp. Vitacost organic ground cinnamon

1/4 tsp. Vitacost Himalayan Pink Salt

1/2 cup walnuts, chopped

Directions

  1. Preheat oven to 350 degrees F.
  2. To prepare your apples, first peel, decore, and slice all apples into wedges- slice again to make wedges more thin. Add the lemon juice and using your fingers, mix apples to coat evenly. Next, add the sugar and nutmeg. Set aside.
  3. In a glass mixing bowl, combine oat flour, brown sugar, cinnamon, butter, salt, and walnuts. Mix until topping mixture has formed.
  4. In a casserole dish, pour apple and evenly place the topping mixture over the apples.
  5. Bake for 45 minutes or until bubbly and top is brown.
  6. Serve immediately with a side of ice cream or a whipped cream topping if you choose.

Chef’s tip: You can add 1/2 tsp. vanilla to the apples if you’d like before baking for added flavor.

Cauliflower Pizza with “Tomato” Sauce

Cauliflower Pizza

Sometimes it can be difficult to find foods that fit our dietary and nutritional needs which is why I have created this gluten and acidic free pizza. Inspired recently by a fellow follower, who is unable to eat tomatoes and has certain dietary restrictions, I came up with this well suitable option. The next family dinner night you have, I invite you to try making this healthy alternative that will leave your belly full. Adding any toppings of your choice is always alright so feel free to get creative!Cauliflower Pizza

Yields 1 large pizza

Ingredients 

1 head cauliflower (about 4 to 5 cups), riced

2 Tbsp. Bobs Red Mill Egg Replacer + 4 Tbsp. filtered water

1/4 cup vegan Parmesan, (optional)

1-2 cloves garlic, minced

1 tsp. oregano

1/2 tsp. fresh basil, minced (optional)

1/4 tsp. Vitacost Himalayan Fine Pink Salt

1/8 tsp. Spicely Organics Ground Black Pepper

1 tsp. Vitacost olive oil

Directions 

  1. Preheat oven to 400 degrees F. 
  2. Using a box grater, grate your cauliflower to make the rice and set it aside. 
  3. In a medium pot, bring 2 cups of water to a boil and pour in cauliflower rice. Allow to cook for 5-6 minutes or until tender. Drain using a fine mesh strainer or cheese cloth. Squeeze any remaining liquid out- very important step. 
  4. In a small bowl, combine your egg replacer and water. Set aside
  5. In a large bowl, combine cauliflower rice, egg replacer, oregano, salt, pepper, basil, garlic, flour, and vegan Parmesan. Mix until dough l-like consistency forms. 
  6. On a lined baking sheet with parchment paper, sprinkle with flour or corn meal to help keep it from sticking. Spread out the dough 1/2 in thick so it has a nice crust to it. 
  7. Bake for 20-25 minutes.
  8. Remove from the oven and add your sauce of choice, vegetables, protein, cheese, or any topping you’d like. Return to the oven for an additional 7-8 minutes just to brown the toppings or cheese. 
  9. Slice and enjoy with parsley or red pepper flakes on top. 

Chef’s tip: Make sure to lightly spray or oil the parchment paper so it does not stick to the crust. Also, I pre roasted a few slices of sliced onion, mushroom, and bell peppers to place on top of the pizza before baking it again.

No-Bake Pumpkin Cheesecake Bars

Pumpkin Cheesecake Bar

Pumpkin Cheesecake Bar

Pumpkin pie is a notorious fall-inspired dish that makes its way on to the dinner table during numerous holiday parties throughout the autumn season. Normally comprising of eggs, dairy, and heavy cream- this recipe leaves those out! This raw vegan dessert uses a cashew “cream cheese” as it’s base, only to be accented with flavorful aromatics such as lemon juice, maple syrup, and pumpkin spice seasoning. Instead of using your oven for this dessert, you’ll only need a mixer and food processor. Can’t wait for you to sink your mouth into this wholesome plant-based and non-baked pumpkin cheesecake!

Pumpkin Cheesecake Bar Crust

Yields 15 servings

Ingredients

Filling:

1/2 cup Vitacost pure maple syrup

2 tsp. pumpkin spice seasoning

2 8 oz. containers of Miyoko’s “Cream Cheese”

1 tsp. vanilla extract

1 1/2-2 cups pumpkin purée, homemade

1 tsp. lemon juice, freshly squeezed

Crust:

2 cups raw almonds, unsalted

8 mejdool dates, pitted

1 Tbsp. pure maple syrup

4 Tbsp. vegan butter or coconut oil

1/3 cup gluten-free rolled oats

1/2 tsp. pumpkin spice seasoning

1/4 tsp. cinnamon  

Whipped “Cream”:

1 13.5 oz. can coconut milk, full fat

1/4 tsp. powdered sugar 

1/4 tsp. vanilla extract

Pumpkin Cheesecake Bar

Directions

  1. To make your crust using a food processor, combine the graham cracker crumbs, coconut oil, and mejdool dates. Pulse until mixture is well combined and is crumbly-looking.
  2. Press crust mixture into a 11”x7” cake pan that has been lined with parchment paper. Set aside.
  3. In a Kitchen-aid stand mixer, pour “cream cheese”, maple syrup, vanilla extract, pumpkin purée, pumpkin spice, and lemon juice and mix until well combined.
  4. Pour mixture into the prepared pie crust and place into the freezer for at least 2 hours to set (overnight-48 hours preferred).
  5. In your stand mixer, combine coconut cream, vanilla, and powdered sugar and whisk for 2-3 minutes until very smooth, be careful not to over mix. 
  6. Once bars have set, allow to defrost for 20 minutes before slicing into equal squares and top with whipped cream and a pecan.


Chef’s tip: Feel free to make the crust out of walnuts and almonds or use a mixture of graham cracker crumbs with walnuts or almonds.

Authentic Columbian Arepas

Vegan Arepas

Vegan Arepas

It’s our favorite day of the week, Taco Tuesday! Change it up this week with these soft and fluffy Arepa’s. With only using 4 ingredients, this recipe is a great and easy weekday meal. After pan frying (or baking) these South American treats to perfection, you will want to try filling your Arepa’s with a variety of food! One of my favorite fillings is fresh jackfruit from Bedner’s Farm. It is a great “texture” if you are looking for an arepa with shredded “meat,” add beans, guacamole, tomato and enjoy! Don’t forget to try this with my Ancho Chili Sauce – it’s the perfect finishing touch for Taco Tuesday!

Vegan Arepas

Yields 10 arepas

Ingredients

2 cups P.A.N Harina Blanca – Pre-cooked White Corn Meal

4 Tbsp. Earth Balance Vegan Buttery Sticks

2 1/4 cups of hot water

1 tsp. Vitacost Himalayan Pink Salt, for flavor

Directions

  1. In a large mixing bowl, combine corn meal, melted butter, and salt. Slowly add the hot water in increments and mix until a dough-like consistency has formed.
    • Note** Do not allow dough to get gooey, it should be slightly wet.
  2. Next, grab a handful of the dough (roughly 1/4 cup) and roll it in to a round sphere. Flatten dough in to a disk shape using the palm of your hand.
  3. Drizzle oil into frying pan and turn on medium-high heat. Cook arepas for 2-3 minutes on each side or until slightly golden brown.
  4. Allow to cool and slice in half. Add desired fillings and enjoy.

Chef’s tip: For added flavor, you may choose to add some extra seasonings: cumin, oregano, red pepper flakes, or adobe all purpose seasoning.