fbpx

Banana Fosters Cheesecake

Banana Fosters Cheesecake

Banana Fosters Cheesecake

One of my many favorite childhood desserts was banana fosters. I think it had to do with the live fire show you would sometimes get at your dinner table. This version is paired with a simple no-bake cheesecake, which in my opinion, is the best combo ever! 

Banana Fosters Cheesecake

Yield 8

Ingredients

Crust:

2 cups rolled oats

1 cup all-purpose organic flour

2/3 cups light brown sugar

1 tsp. Himalayan Fine Pink Salt

1/2 cup finely chopped walnuts, optional

Filling:

3 cups cashews, soaked overnight

1/2 cup + 2 Tbsp. filtered water

1/2 cup + 2 Tbsp. maple syrup

1/2 cup coconut oil

4 Tbsp. lemon juice

1 tsp. vanilla extract

Banana Foster Topping:

3 to 4 ripened bananas, sliced

1/2 cup vegan butter

1-1/3 cup light brown sugar

1/2 cup dark rum

1/2 tsp. ground cinnamon

2-1/2 tsp. vanilla extract

Pinch of Himalayan Salt

Sprinkle of cinnamon, optional

Banana Fosters Cheesecake

Directions

  1. Preheat oven to 375 degrees F.
  2. In a food processor, add the crust ingredients and process until it starts to form a sticky-like dough. Once clumped together, transfer to your springform pan and press it down evenly.
  3. Bake for 14 to 18 minutes or until crust is lightly brown. Set aside to cool.
  4. In a blender, take your soaked cashew, water, maple syrup, coconut oil, lemon juice, and vanilla and blend until very smooth.
  5. Pour mixture on top of the almond crust and smooth down with back of a spatula. Place back into the freezer to set fully, about 5-7 hours (best results overnight).
  6. Allow cheesecake to thaw at room temperature for at least 20-30 minutes before serving.
  7. In the meantime, add your butter, cinnamon, and brown sugar to a skillet. Melt until bubbly, add the bananas. Carefully, add the rum and light with a lighter. Allow alcohol to cook off (will take about 30 seconds) before adding vanilla and salt.
  8. Remove the cheesecake from springform pan and top with hot banana fosters sauce.


Chef’s tip: Add 1/2 cup chopped walnuts before flambéing the banana mixture.

Applesauce Bars

Applesauce Bars

Applesauce Bars

When you have to make a dessert that is easily shareable, these bars are your go-to  dessert. With a simple glaze that covers the top, these homemade applesauce bars are the perfect treat! The best way to enjoy these bars are when they come out of the oven and have slightly cooled. The warm sensation with Fall flavors and cinnamon glaze is a finger-licking good recipe.

Applesauce Bars

Yield

Ingredients

1 cup organic cane sugar

1 cup applesauce

1/2 cup avocado oil

2 cups all-purpose organic flour

1 tsp. baking soda

1/2 tsp Himalayan fine pink salt

1/2 tsp. ground cinnamon

1/2 tsp. ground nutmeg

1/4 tsp. ground cloves

1 cup raisins

1/2 cup  walnuts nuts

Glaze:

1/2 cup powdered sugar

1-2 Tbsp. hot water, use as needed

1/8 tsp. ground cinnamon

1/8 tsp. Himalayan salt

Directions

  1. Preheat oven to 350 degrees F.
  2. In a bowl, combine the sugar, apple sauce, and oil. Mix together the flour, baking soda, salt, cinnamon, nutmeg, and cloves in a separate bowl and add it to the wet mixture. Stir until combined. Fold in the raisins and nuts.
  3. Grease and flour a 13×9-inch baking pan and add the cookie bar mixture.
  4. Bake for 30 minutes. Remove from oven and allow to cool slightly before topping with glaze.
  5. Enjoy


Chef’s tip: You can swap the raisins for another type of dried fruit of your choosing.

Mushroom-Walnut Taco “Meat”

Mushroom-Walnut Taco “Meat”

Mushroom-Walnut Taco “Meat”

Upgrade your taco Tuesday spread with my mushroom-walnut taco “meat” recipe! Seasoned-to-perfection, this crumbly plant-based filling has a soft, yet slightly crunchy, texture. Layer a spoonful onto a taco, stuff it inside a burrito or toss it with a salad paired with a dollop of cashew sour cream, salsa and my moringa guacamole!

Mushroom-Walnut Taco “Meat”

Yields 16 oz 

Serves 3-4 people

Ingredients

16 oz. baby Bella mushrooms

1/2 cup whole walnuts, chopped

1 medium onion, diced

1-2 garlic cloves, minced

1/2 cup filtered water

Taco Seasoning:

1/2 Tbsp. Chili powder

3/4 tsp. ground cumin

1/8 tsp. garlic powder

1/8 tsp. onion powder

1/4 tsp. smoked paprika

1/2 tsp. Vitacost Himalayan Fine Pink Salt

1/4 tsp. ground black pepper

1/4 tsp. oregano

Directions

  1. In a frying pan on medium-high heat, combine mushrooms, onion, garlic, and cook for 5-8 minutes or until lightly brown. Add walnuts and cook for an additional 2-3 minutes.
  2. Mix all seasonings into the mushroom-walnut “meat” and pour in the water. Cook for 2 minutes or until water has cooked down. Remove from heat and set aside.
  3. Serve with a flour tortilla or hard shell taco and any toppings you’d like.


Chef’s tip: To kick this dish up a notch, add some sirachs or hot sauce of choice.  

Festive Kale Salad with Cranberry Vinaigrette

Festive Kale Salad with Cranberry Vinaigrette

Welcome to your new favorite holiday kale salad! Kale has been one of my favorite go-to leafy greens for awhile now because it is so nutrient dense. It is an excellent source of Vitamin C and is loaded with powerful antioxidants (Kale Yeah!) The cranberry vinaigrette is made with freshly squeezed citrus, cranberries, vinegar, agave, and other flavorful components. Whether it is your first time trying kale or you have had it plenty of times before, this recipe is something you’ve gotta check out.

Festive Kale Salad with Cranberry Vinaigrette

Yields 4-5 servings

Ingredients

6 cups kale, de stemmed and sliced – need

3 Tbsp. avocado oil

1/4 tsp. Vitacost Himalayan Fine Pink Salt

1/2 cup Vitacost organic walnuts

2 clementine oranges

1/2 cup cranberries

1-1/2 tsp. lemon juice

2 garlic cloves, minced

1 Tbsp. shallot, minced

1 Tbsp. agave

1 Tbsp. apple cider vinegar

Directions

  1. In a large bowl, add the kale and massage with a drizzle of olive oil for 1-2 minutes, until tender.
  2. In a small pan, add the oil and shallots and sauté for 2 minutes. Then add the garlic, lemon juice, garlic, agave, and apple cider vinegar. Cook for 1-2 minutes on low and remove from heat.
  3. Place the clementine wedges and walnuts onto the salad. Drizzle the slightly warm vinaigrette over the salad and give a good toss.


Chef’s tip: If you would like to add pomegranate seeds, they would be a delicious touch to this salad!

Butternut Squash Salad with Watermelon and Walnuts

Butternut Squash Salad

Butternut Squash Salad

Juicy watermelon with roasted butternut squash is an interesting and new way to treat yourself during those autumn nights. This light and refreshing salad paired with a red wine vinaigrette is a delicious combination of sweet and savory! If you are looking for some extra protein, hemp seeds are a great touch with also add extra texture to any dish. This dish was inspired by a recent outing to one of my favorite restaurants. I am sure glad that I was able to make my own version of this delicious fall-inspired salad.

Butternut Squash Salad

Yields 2 salads

Ingredients

1/4 watermelon, diced into medium cubes

1 butternut squash, cut in half and de-seeded

5 oz. arugula

1 cup walnuts, rough chop

Dressing:

1/2 cup avocado oil

1/4 cup red wine vinegar

1 Tbsp. balsamic reduction

1 tsp. sugar

1/4 tsp. Vitacost Pink Himalayan Fine Salt

1/4 tsp. Spicely Organics ground black pepper

1 tsp. lemon juice, (optional)

Butternut Squash Salad

Directions:

  1. Preheat oven to 400 degrees F.
  2. Peel butternut squash and slice in half length-wise. Remove seeds and rinse- you can dry them and store in the freezer or you can roast them.
  3. Take your prepared squash and dice it in to long pieces.
  4. Place onto a lightly oiled pan and season lightly with salt and pepper.
  5. Bake for 30-45 minutes, flipping half way through.
  6. Remove from oven and allow to slightly cool.
  7. While squash is cooling, in a small measuring glass, mix together all dressing ingredients and stir until well mixed, set aside.
  8. For your salad, put arugula into a large bowl. Add watermelon, walnuts, butternut squash, and hemp seeds (save some to top salad with). Pour dressing over and mix to fully coat.

Chef’s tips: You can brush the squash with vegan butter and brown sugar if you would like to caramelize your squash a bit and add a different flavor to the salad.

Rhino’s Pumpkin Roll

Pumpkin Roll

Pumpkin Roll

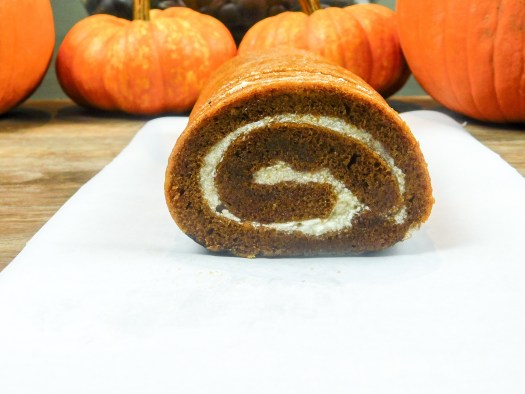
Have you ever tried making a thin pumpkin cake, only to later roll it around in a white plant-based cream cheese filling and topped with dusted powdered sugar? If you haven’t then you are in for a real treat! This simple pumpkin roll will not only wow all of your family and friends, but you will surely impress yourself with this restaurant-style dessert made in the comfort of your own home. The best part about any Swiss roll cake is that you can keep it in the freezer for any surprise guests that drop by or you can take it to a gathering or give it as a tasty gift during the holiday season. This recipe is so good that you may need to make two at a time!

Pumpkin RollPumpkin Roll

Yields 1 cake; around 10 slices

Ingredients

Cake:

1 cup granulated sugar

4 Tbsp. Bob’s Red Mill Egg Replacer + 8 Tbsp. Water, (in 2 batches)

1 cup homemade pumpkin purée

1 cup King Arthur all-purpose organic flour

1 tsp. baking powder

1/2 tsp. Vitacost ground cinnamon

1 Tbsp. pumpkin spice seasoning

1/2 tsp. Vitacost Fine Himalayan Pink Salt

1/8 cup Vitacost powder sugar, for dusting

1 cup walnuts, chopped (optional)

Cream cheese frosting:

4 Tbsp. Earth Balance Vegan Buttery Sticks, room temperature

8 oz. Kite Hill Cream Cheese

1 cup Vitacost powdered sugar

1 Tbsp. Vitacost pure maple syrup

Directions

Cake:

  1. Preheat oven to 375 degrees F.
  2. Line a baking sheet with parchment paper and lightly grease with cooking spray or vegan butter.
  3. In a stand mixer, beat the already combined egg replacer and water with the sugar for 1-2 minutes or until it thickens. Add the pumpkin puree; mix till combined.
  4. Add the flour, baking soda, cinnamon, pumpkin spice, salt, and baking powder into the batter. Mix together until flour is combined and switch to using a spatula. This way you can get a few more stirs in without over mixing the batter.
  5. Pour the batter onto the 10×15 baking sheet and bake for 15-17 minutes or until the cake springs back after you touch it. Prepare your dish towel while it bakes by dusting it heavily with powdered sugar. This will prevent the cake from sticking.
  6. Once the cake springs back after toughing it, remove it from the oven and immediately (and carefully) flip the cake pan on top of the towel and remove the parchment paper slowly (there will be a massive cloud of powder sugar so prepare yourself).
  7. Begin to roll the towel with the cake into a log shape and allow to cool on a cooling rack until room temperature. Make sure that you do not let the cake cool for more than an hour, or it can cause the cake to crack when you go to unroll it.

Buttercream:

  1. In a mixing bowl, beat the butter and cream cheese for 2-3 minutes on a medium speed until well combined.
  2. Then add the powdered sugar and maple syrup (or flavoring) and mix; set aside.

Pumpkin Roll

Assembly:

  1. Carefully unroll the log and spread the frosting in a single layer. Cover the frosting with the walnuts at this time (optional).
  2. Re-roll the cake back up into a log shape..
  3. Place into the refrigerator for 1-2 hours to allow cake and frosting to firm up a bit (set overnight for best results).
  4. Remove from the fridge and dust top with powdered sugar.
  5. Serve and enjoy.

Chef’s tip: Move quickly when cooling this cake, or it will crack and break when you go to roll it. You can also use pecans instead of walnuts.