fbpx

Jumbo Bakery Style Blueberry Muffins

Jumbo Bakery Style Blueberry Muffins - The Vegan Rhino

Jumbo Bakery Style Blueberry Muffins - The Vegan Rhino 

This jumbo bakery style blueberry muffin is one of the tastiest I’ve had in awhile and it is here for you all to try! The key to this super moist and tender muffin is making your own buttermilk with oat milk and lemon juice. Paired with fresh blueberries and lots of lemon zest, these muffins are a real treat without the sweet taste.

Jumbo Bakery Style Blueberry Muffins - The Vegan Rhino

Yield: 9 muffins

Ingredients

3/4 cup + 2 Tbsp. oat milk

2 1/4 tsp. lemon juice

1/2 cup plant-based butter, softened

1/2 cup organic cane sugar

1/4 cup light brown sugar

2 Tbsp. Bob’s Red Mill Egg Replacer + 4 Tbsp. water, prepared

1 1/2 tsp. vanilla extract

2 tsp. fresh lemon zest

2 1/2 cups organic all-purpose flour, extra for blueberries

1/2 tsp. Himalayan pink salt

2 1/2 tsp. baking powder

1 us dry pint blueberries, washed, drained and picked over

3 tsp. organic cane sugar, topping


Topping (optional)

1/4 cup all-purpose flour

1/4 tsp. baking powder

1 Tbsp. + 1/2 tsp. organic cane sugar 

1 Tbsp. + 1 1/2 tsp. plant-based butter, cut into tiny cubes


Directions

  1. Preheat the oven to 425 degrees F. In a small bowl, mix together oat milk and lemon juice and let sit.
  2. In a small bowl, combine topping ingredients using a fork until small crumbles form. (Optional)
  3. Cream the softened butter and sugars until light and fluffy.
  4. Add prepared egg replacer, vanilla extract and lemon zest, beating until just mixed.
  5. Sift together the flour, salt and baking powder, and add to the creamed butter mixture alternately with the buttermilk we previously made. Dust blueberries lightly in 2 teaspoons of flour and fold in the blueberries to the batter. Avoid over mixing.
  6. Line 9 muffin tins with jumbo muffin liners or jumbo tulip liners, and fill batter to the top (about 7 1/2 tablespoons each muffin cup). Sprinkle tops of muffins with the 3 teaspoons sugar or use topping mixture in step 2.
  7. Bake for about 5 minutes.
  8. Keep oven closed and reduce oven temperature to 375 degrees F.
  9. Bake for 25 minutes until lightly golden brown on top. To test, insert a toothpick in the center and if it comes out clean, it’s done.
  10. Remove muffins from oven and let cool for at least 5 minutes before placing on wire rack to cool completely. Store, uncovered, or the muffins will be too moist the second day.


Chef’s tip: I like to fill each muffin cup with a ice cream scooper until it’s evenly distributed.

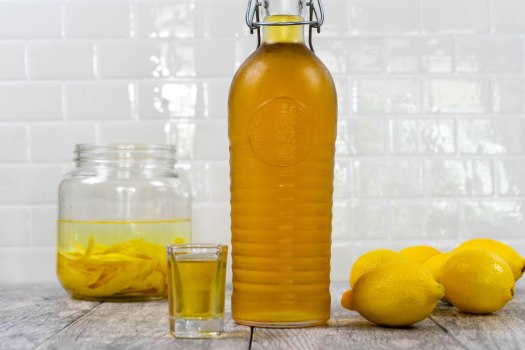
Limoncello

Lemoncello - The Vegan Rhino

Lemoncello - The Vegan Rhino

Limoncello is an Italian liquor made from the zest of lemons steeped in alcohol until the natural oils and aromatics release. The resulting liquid is combined with a simple syrup and bottled, resulting in a delicious drink to sip or drizzled over ice cream, either way you decide its delicious! This is one of those things you can enjoy year round, and makes for the perfect gourmet gift for any occasion.

Lemoncello - The Vegan Rhino

Yield roughly 2 bottles, 3 1/2 cups lemon juice

Ingredients

15 lemons, peeled

850 mL vodka

2 cups organic cane sugar or 3/4 cup monk fruit sugar

3 3/4 cups filtered water


Directions

  1. Using a vegetable peeler, peel the skin of the lemons and trim away any pith remaining on the lemon peels.
  2. In a large pitcher with the lemon peels, pour the vodka over them and cover tightly. Steep the peels in the vodka for 8 days at room temperature.
  3. In a sauce pan over medium-high heat, combine the sugar and water until it dissolves, about 3 minutes. Pour the syrup into the vodka mixture, mix, and strain into bottles. Let sit at room temperature for 14 days before storing in refrigerator until cold.
  4. Serve chilled and enjoy.


Chef’s tip: Make sure you use 100 proof and higher.

Cool Blue Nice Cream

Cool Blue Nice Cream - The Vegan Rhino


Cool Blue Nice Cream - The Vegan Rhino 

If you have heard of nice cream, you are going to love this! For those of you have not, nice cream is essentially a non-dairy ice cream made by freezing bananas and blending them. It is probably the best snack to enjoy on a hot day, after dinner for dessert, or even after a workout. Either way, the options are endless on when you can enjoy this cool blue nice cream bowl! To get this color, I added a natural butterfly pea supercolor powder by Suncore foods. They have tons of amazing powders that can give your foods a natural color boost with added nutrients and benefits. This bowl was topped with banana, dried apricots, and strawberries. Its super simple and a tasty snack to try!

Cool Blue Nice Cream - The Vegan Rhino

Yield 1

Ingredients

4 frozen bananas

1/3 cup oat milk

2-3 tsp Suncore foods Blue Butterfly Pea Supercolor Powder


Directions

  1. In a blender, combine the frozen bananas, oat milk, and butterfly pea powder. Blend until smooth using a tamper to evenly mix the nice cream.
  2. Pour into a bowl and tip with strawberries, diced dried apricot, banana, or any toppings of your choice.


Chef’s tip: Feel free to switch up the powder used.

Banana Fosters Cheesecake

Banana Fosters Cheesecake

Banana Fosters Cheesecake

One of my many favorite childhood desserts was banana fosters. I think it had to do with the live fire show you would sometimes get at your dinner table. This version is paired with a simple no-bake cheesecake, which in my opinion, is the best combo ever! 

Banana Fosters Cheesecake

Yield 8

Ingredients

Crust:

2 cups rolled oats

1 cup all-purpose organic flour

2/3 cups light brown sugar

1 tsp. Himalayan Fine Pink Salt

1/2 cup finely chopped walnuts, optional

Filling:

3 cups cashews, soaked overnight

1/2 cup + 2 Tbsp. filtered water

1/2 cup + 2 Tbsp. maple syrup

1/2 cup coconut oil

4 Tbsp. lemon juice

1 tsp. vanilla extract

Banana Foster Topping:

3 to 4 ripened bananas, sliced

1/2 cup vegan butter

1-1/3 cup light brown sugar

1/2 cup dark rum

1/2 tsp. ground cinnamon

2-1/2 tsp. vanilla extract

Pinch of Himalayan Salt

Sprinkle of cinnamon, optional

Banana Fosters Cheesecake

Directions

  1. Preheat oven to 375 degrees F.
  2. In a food processor, add the crust ingredients and process until it starts to form a sticky-like dough. Once clumped together, transfer to your springform pan and press it down evenly.
  3. Bake for 14 to 18 minutes or until crust is lightly brown. Set aside to cool.
  4. In a blender, take your soaked cashew, water, maple syrup, coconut oil, lemon juice, and vanilla and blend until very smooth.
  5. Pour mixture on top of the almond crust and smooth down with back of a spatula. Place back into the freezer to set fully, about 5-7 hours (best results overnight).
  6. Allow cheesecake to thaw at room temperature for at least 20-30 minutes before serving.
  7. In the meantime, add your butter, cinnamon, and brown sugar to a skillet. Melt until bubbly, add the bananas. Carefully, add the rum and light with a lighter. Allow alcohol to cook off (will take about 30 seconds) before adding vanilla and salt.
  8. Remove the cheesecake from springform pan and top with hot banana fosters sauce.


Chef’s tip: Add 1/2 cup chopped walnuts before flambéing the banana mixture.

Caramel Sauce

Caramel

Caramel

This sticky pot of goodness is a great version if you are looking for less sugar and more caramel. Although it is still comprised of sugar, you are not going to be overwhelmed by the sugar, as most caramels can have. This homemade caramel is great for dunking apples or even making a caramel peanut brittle, the options are endless.

Yields 1 large mason jar

Ingredients

1 cup butter

1-1/4 cups brown sugar + 1/4 cup water (DIY light corn syrup)

2 cup Vitacost brown sugar

2 tsp. vanilla extract

14 oz. condensed “milk”

Directions

  1. Add all ingredients into medium sauce pan and bring to a boil on medium-high heat. Make sure to constantly stir until 20-25 minutes have passed or temperature reaches 245 degrees F (soft ball stage). 
  2. Remove from heat and allow to cool before adding the vanilla. Store in and mix. Allow caramel to cool.
  3. Pour into mason jar or air tight container and store for up to 1 week in refrigerator.

Chef’s tip: Make sure that you do not go over 245 degrees F or you will have a caramel that will crack.

Pineapple Upside-Down Cake 

Pineapple Upside-Down Cake 

Pineapple Upside-Down Cake  

Sweeten up your life with this vegan Pineapple Upside-Down Cake. Super moist and full of flavor! Inspired by Dan and Méz amazing pineapple leather wristband and classic-style watch, I thought why not veganize an old favorite of mine. It’s perfect for the holidays or re creating that flip-flop and t-shirt weather  vibe.

Pineapple Upside-Down Cake 

Yield 8

Ingredients

Topping:

1/2 cup Vitacost light brown sugar

1/4 cup vegan butter, softened

10 pineapple slices, fresh or canned

16-19 maraschino cherries

Cake:

1/3 cup vegetable shortening

1 cup organic cane sugar

3/4 cup oat milk

1 Tbsp. Bob’s Red Mill Egg Replacer + 2 Tbsp. filtered water

1-1/3 cup King Arthur organic flour

1-1/2 tsp. baking powder

1/2 tsp. Vitacost Himalayan Fine Pink Salt

Directions

  1. Preheat oven to 350 degrees F.
  2. In a 9×2 inch round cake pan, melt the butter in the oven. Sprinkle the brown sugar over the melted butter; arranging the pineapple slices over the brown sugar. Place cherries in the center and gaps where the pineapple slices touch.
  3. In a medium bowl, sift together the flour and baking powder; set aside. In a stand mixer, beat together the sugar and shortening, about 2 minutes. Mix together the egg replaced and water and allow to sit until thickens. Add the egg replacer and oat milk, mixing until well combined. Slowly add the dry ingredients into the stand mixer. Once combined, beat for 2 to 3 minutes on medium-high. Pour the batter directly on top of the pineapple slices and cherries.
  4. Bake for roughly 50 to 55 minutes or until the cake edges pull away from the cake pan. Once done baking, place a heat proof plate on top of the cake pan and flip it over. Allow to sit for 1 minute to let the caramel drizzle over; remove pan.
  5. Serve warm with a side of vegan vanilla bean ice cream.

Chef’s tip: Remove the cake quickly from the pan otherwise the fruit will stick to the bottom. Have a cake board or plate ready to go.


Other recipes


Cookie Dough Bites

Cookie Dough Bites

I don’t know about you but cookie dough bites and a good movie with popcorn are my go-to choices. I’ve created with my friends at EatPastry these fun bite-sized cookie dough bites with their non-GMO, vegan, egg and dairy free cookie dough. It’s super convenient if you are looking for some quick homemade cookies at home. Using the dough to create other favorite indulgent treats is the perfect way to be creative. Feel free to give this recipe a try, they sell at Whole Foods and other locations, which you can search for on their site.

Yields 20-25 cookie dough bites

Ingredients

1 tub eatpastry cookie dough

1 cup chocolate chips of choice

3-4 Tbsp. coconut oil or plant-based butter

Coarse rock salt, to garnish (optional)


Directions

  1. Using a 1/4 tsp., scoop the dough into small rounds and set onto a parchment lined baking sheeted.
  2. Place into the freezer until they are semi frozen, roughly 20-25 minutes.
  3. In a glass bowl, add chocolate and coconut oil.
  4. Bring a sauce pot filled a quarter of the way with water to a simmer. Place the glass bowl on top and melt chocolate until smooth, stirring occasionally. Remove from heat.
  5. Take the cookie dough bites out of the freezer and dip them into the chocolate and place back onto the baking sheet.
  6. Place in the refrigerator until chocolate sets, roughly 30 minutes.
  7. Serve as a snack or on top of ice cream.

Chef’s tip: These can be kept in the fridge for up to a week.

Russian Teacakes

Russian Teacakes


Russian Teacakes

Have you ever had the chance to enjoy a light and fluffy Russian Teacake cookie during Christmas? If you haven’t, this cookie is perfect since it only uses a handful of ingredients and goes well with any cup of coffee or tea. In thinking back to when my mother would make these, id always manage to sneak a few that were freshly rolled in the powder sugar and slightly warm! Boy oh boy were those the best.


Russian Teacakes

Yields 36 cookies

Ingredients

1 cup vegan butter

1/2 cup powdered sugar

1 tsp. vanilla extract

2-1/4 cups all-purpose flour

1/4 tsp. Vitacost Himalayan Fine Pink Salt

3/4 cup finely chopped pecans

powdered sugar to roll

Russian Teacakes

Directions

  1. Preheat oven to 400 degrees F.
  2. In a kitchen-aid mixer, cream together the butter and sugar for 1-2 minutes.
  3. Add the vanilla, salt and slowly incorporate the flour into the mixture until the cookie dough forms. Then add the pecans until combined.
  4. Roll the dough into 1-in diameter balls and place onto a non-stick cookie sheet.
  5. Bake for 10-12 minutes until set, not browned.
  6. Remove form oven and roll the warm cookie into the powdered sugar. Take out of the powder sugar and allow to cool.
  7. Once cooled, place the cookies back into the powder sugar and re-roll to coat.
  8. Serve with coffee or tea.

Chef’s tip: If you’d like, you could also make this recipe with hazelnuts. Just roast them and crack them open!

Carrot Cake with “Cream Cheese” Frosting

Carrot Cake

Carrot Cake

This spiced cake with organic carrots and a non-dairy cream cheese frosting is perfect for any occasion or birthday celebration! Feel free to make this cake gluten-free by using TigerNut flour- its’ a great option for those with nut allergies. I do have to warn you that this cake is effortless to make and dangerously moist so be careful when you taste how flavorful it is. Thanks to this recipe that I get to share with you all, you too will be able to enjoy this amazing dessert!

Carrot Cake

Ingredients

Cake:

2 cups organic flour

2 tsp. baking powder

1 tsp. baking soda

1-1/2 tsp. ground cinnamon

1/2 tsp. ground ginger

1/4 tsp. nutmeg

1/2 tsp. Vitacost Himalayan Fine Pink Salt

4 Tbsp. Bob’s Red Mill Egg Replacer + 8 Tbsp. filtered water

1 cup organic sugar

1 cup Vitacost brown sugar

3/4 cup avocado oil

1/4 cup apple sauce

1/4 cup crushed pineapple

1 tsp. vanilla extract

3 cups shredded carrots

Cream Cheese Frosting:

1 (8 oz) Mykonos Cream cheese 

1/2 cup vegan butter, softened

2 cups Vitacost powdered sugar 

1 tsp. vanilla extract

Directions 

Cake:

  1. Preheat oven to 350 degrees F.
  2. In a mixing bowl, combine white and brown sugar with oil and Egg Replacer. Mix until well combined and then add the apple sauce, crushed pineapple, and vanilla. 
  3. Then add the nutmeg, cinnamon, ginger, salt, baking soda, baking powder, and the flour. Once mixed, add the carrots and fold them in. 
  4. In a greased cake pan, pour the cake batter in and place in the preheated oven for 30-35 minutes or until the top is nice and golden brown. 

Frosting:

  1. In a bowl combine all ingredients and beat until frosting has formed. 
  2. Spread evenly over the cake once it has cooled and top with walnuts. 

Chef’s tip: If you would like, you can add 1/2 cup raisins to the batter at the end, mixing it in.

Banana Cream Pie

Banana Cream Pie

Banana Cream Pie

Feast your eyes on the best Banana Cream Pie that is 100% dairy-free and homemade! This graham cracker pie shell filled with bananas and a homemade vanilla pudding is the ultimate dessert! Simply add cacao nibs and sliced bananas to the top and you are ready to serve. This banana cream pie has an amazing natural flavor of fresh organic bananas as well as a smooth  coconut cream.

Banana Cream Pie

Yields 8 slices

Ingredients

1 Keebler Ready Crust Graham Pie Crust

1/3 cup organic cane sugar

2 Tbsp. cornstarch

1-1/2 cup almond milk

1 tsp. vanilla extract + 1/2 tsp. for whipped cream

1-2 banana, sliced

1 (14 oz) can coconut cream, not the liquid

4 Tbsp. Vitacost powdered sugar

pinch of Vitacost Himalayan Fine Pink Salt, optional

Directions

  1. In a sauce pan on medium-high heat, add the almond milk, sugar, cornstarch and salt; stirring until dissolved.
  2. Once mixture is boiling, reduce to medium-low and cook for 2-3 minutes, removing from heat and setting side. When cooled, add the vanilla extract.  Place into a glass bowl and cover the top. Chill for 2 hours in the fridge.
  3. In a KitchenAid stand mixer, add the cream and whip on high until soft peaks form. Slowly add the powder sugar to the mixer. Then add the vanilla and whip again for 1-2 minutes.
  4. Take the pudding out of the fridge and fold together the whipped cream and pudding. 
  5. Slice bananas and add some to the bottom layer. Fill with pudding mixture and top with bananas, cacao nibs, and extra whipped cream if you’d like. Place back into the fridge for 2 hours to set before serving.

Chef’s tip: For optimal quality, allow to set overnight and then serve.