fbpx

Butternut Squash Mac and Cheese

Butternut Squash Mac and Cheese

Butternut Squash Mac and Cheese

If Thanksgiving had a specific taste, I think it would be this recipe. This butternut squash macaroni and cheese is the perfect alternative if you are living a plant-based lifestyle or if you simply can’t tolerate dairy.  This meal is simple, comforting, and can be paired well with a simple green salad for a perfect meatless meal. I think you may have just stumbled across your new favorite fall dish!

Butternut Squash Mac and Cheese

Yields 6 servings

Ingredients

1 medium butternut squash, peeled, seeded, and diced

1 small shallot, quartered

1-1/2 cups oat milk

1/2 cup vegetable broth

1/2 tsp. Himalayan salt

1/4 tsp. white pepper

1/4 tsp. ground nutmeg

1-1/2 cups vegan cheddar cheese

1/4 cup vegan Parmesan cheese

1 lb. box elbow pasta, cooked

Directions

  1. In a pot over medium-high heat, add the butternut squash, shallots, oat milk, vegetable broth, and salt. 
  2. Bring to a simmer and reduce heat to medium-low; cover and cook until squash is tender. Check with a fork after 20 minutes. Add the cheddar and Parmesan cheese, stirring until melted.
  3. Using an immersion blender, purée the squash mixture until smooth. Mix in the pepper and nutmeg.
  4. In a large bowl, combine the pasta with the sauce.
  5. Stir until the pasta is well combined and the cheese has melted. 
  6. Serve and enjoy. 

Chef’s tip: For an added bonus, crisp up some sage leaves in vegan butter. Drizzle some of the sage butter on top as well. 

Dairy-Free Ricotta Stuffed Shells

Dairy-Free Ricotta Stuffed Shells

Comfort food, to me, feeds the body, mind, and well- belly of course. The light and smooth ricotta cheese with fresh herbs makes for a remarkable flavor combination with my pasta sauce (or gravy) as some may refer to it as. Paired with a tomato sauce, homegrown basil, and baked to perfection, what can be better than that? This recipe is great for an easy weekday dinner or even a quick meal prep for the busy work or school week.

Dairy-Free Ricotta Stuffed Shells

Yields 3-4 servings

Ingredients

1/2 box Barilla Jumbo Pasta Shells, cooked

2 cups pasta sauce

Ricotta:

1 (8 oz.) extra Firm tofu, pressed

1 tsp. fresh lemon juice 

1 tsp. fresh parsley, chopped

1/2 tsp. Vitacost Himalayan Fine Pink Salt 

1/8 tsp. ground black pepper

1-2 tsp. garlic, minced

3 cups sautéed spinach, chopped and patted dry

3/4 cup Vitacost unsalted cashews, soaked overnight

3 Tbsp. nutritional yeast

2 Tsp. onion powder

1/8 tsp. ground nutmeg

2 Tbsp. fresh basil, chopped

Directions

  1. In a food processor, combine all ricotta ingredients until smooth; pulse roughly 1-2 minutes.
  2. Scoop mixture into a container and place into the refrigerator for at least 1 hour before using.
  3. Preheat oven to 350 degrees F.
  4. Cook the pasta according to the box instructions and allow to cool.
  5. Fill the shells carefully with the ricotta mixture you prepared earlier. Repeat until all shells are filled. Place into a baking dish with pasta sauce on the bottom.
  6. Pour remaining sauce around the shells and cover with a lid.
  7. Bake for 15-20 minutes covered to allow the pasta to soak up some of the sauce.
  8. Serve with salad or side of choice.

Chef’s tip: Add red pepper flakes to the mixture, it gives a great spicy flavor.

Nutty Pecan Cookies

Nutty Pecan Cookies
Nutty Pecan Cookies

This is the best Pecan Cookie recipe ever! Everyone needs a good cookie recipe in their life, and this is defiantly mine. Personally, I love a cookie that is both chewy and crispy, and this is both of those. Pecans usually are underrated in my opinion and don’t get used all that much. The crisp buttery cookie baked with the pecan nuts make for a real special treat, which is why I think they are perfect! For a little added bonus, roll the cookies into rounds the night or day before and place them into the freezer. This way you can pop out a coupe at a time without the need to bake them all at once.

Nutty Pecan Cookies

Yields 24 cookies

Ingredients

1 cup vegan butter

1 cup organic sugar

1 Tbsp. Bob’s Red Mill Egg Replacer + 2 Tbsp. filtered water

1 tsp. vanilla extract

2 cup King Arthur organic flour

1/2 tsp. baking soda

1/2 tsp. baking powder

1/4 tsp. Vitacost Himalayan Fine Pink Salt

1 cup pecans, chopped

Directions

  1. Preheat oven to 350 degrees F.
  2. In a kitchen aid mixer, add butter and sugar and cream for 2-3 minutes. Add the vanilla, egg replacer and mix to combine. 
  3. Add the flour, baking soda, baking powder, and salt. Stir until combined and then mix in the chopped pecans.
  4. Using a 1” cookie scoop, dispense cookies and bake until they puff. Roughly 10-12 minutes.
  5. Remove cookies from the oven and allow to cool completely. Transfer to a cookie tray or package in a tin.

Chef’s tip: Feel free to add any other nuts to this or swapping the extract for another flavor!

Chocolate-Espresso Brownies

Chocolate-Expresso Brownies

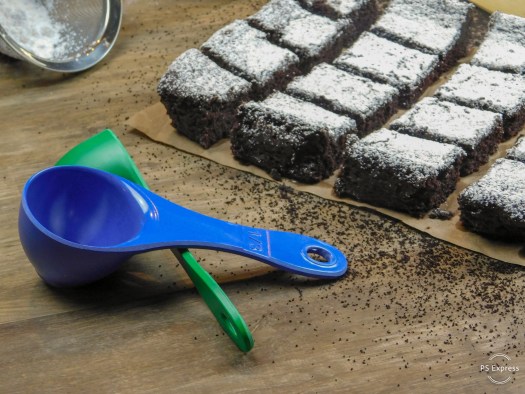
Why yes, a Chocolate-Espresso Brownie does sound like an amazingly delicious treat! These cake-like brownies are dusted in powdered sugar with just the right amount of chocolate and espresso flavor. Without the use of eggs, “real” butter, and dairy, you are still able to get the perfect dessert. Dunk-able and stackable with ice cream and hot fudge, these brownies are universal in whichever way you’d like to enjoy! Feel free to add chopped walnuts or chocolate chips for some extra crunch or a warm gooey chocolate surprise.

Chocolate-Expresso Brownies

Yields 16 brownies

Ingredients

1 cup butter

2 cups sugar

4 Tbsp. Bob’s Red Mill Egg Replacer + 8 Tbsp. filtered water

2 tsp. vanilla extract

1/2 tsp. baking powder

3-4 Tbsp. ground expresso of choice

2/3 cup cocoa powder

1 cup King Arthur flour

1/2 tsp. Vitacost Himalayan Fine Pink Salt

Directions

  1. In a mixing bowl, cream together the sugar and butter until light and fluffy. Mix in the egg replacer until well combined and add the vanilla extract.
  2. Preheat oven to 350 degrees F.
  3. Slowly add the flour, baking powder, salt, and cocoa powder. Mix until batter is combined and pour into a well greased or parchment lined baking dish.
  4. Bake for 40-45 minutes, or until a toothpick comes out clean. Make sure not to over bake your brownies.
  5. Allow to cool before dusting with powder sugar.
  6. Serve with plant-based milk and/or ice cream.

Potato-Parsnip Leek Soup

Potato-Parsnip Leek Soup


Potato-Parsnip Leek Soup

Potato leek soup, or as the French call it potage parmentier, is a classic dish that can be found in many restaurants. In my plant-based version, I added parsnips, which pair well with the subtleness of the leeks, potatoes, and shallots. Not only does this meal taste delicious, but it is ready in under 30 minutes- double score!! Being able to have meals that are healthy and quick at your disposal help keep you on track. Be sure to give this one a try, my tip to make this real special is to drizzle truffle oil on top.

Potato-Parsnip Leek Soup

Yields 6 servings

Ingredients

3 Tbsp. vegan butter

5 cups leeks, white and light green parts only, chopped

2 shallots, diced

3 cloves garlic, peeled and smashed

1/2 cup parsnips, chopped

2 pounds Yukon Gold potatoes, peeled and chopped

7 cups vegetable broth

2 bay leaves

3 sprigs fresh thyme

1 tsp. Vitacost Himalayan Fine Pink Salt

1/4 teaspoon ground black pepper

1 cup cashew milk

Chives, finely chopped, for garnish

Directions

  1. In a pot on medium-high heat, melt the butter. Add the leeks, garlic, and shallots- cooking until wilted, about 8-10 minutes.
  2. Add the potatoes, parsnips, vegetable stock, thyme, bay leaves, salt, pepper, and bring to a boil.
  3. Cover soup and reduce to simmer for 10-15 minutes (until the potatoes have softened). Remove the thyme and bay leaves once done and blend using a hand-held immersion blender until smooth.

Chef’s tip: Enjoy this soup with toasted baguettes or croutons.

The Ultimate Cheese Board

Cashew Cheese Board
5 Cashew Cheese Wheels

Are you tired of putting out chips and dip for your family parties and looking for an alternative to the “unhealthy” snacks we load up on during the holidays? Well look no further, because I have this amazing plant-based cashew cheese board with five cheese wheels. This recipe shows you how to take one plain (scrumptious and delicious) cashew cheese and turn it into crafted artisan cheese that will have your guests asking where you purchased it from. Although this recipe does take a bit of time to make, it is well worth every bite.

Yields 4-5 servings per wheel

Plain Cashew Cheese

Plain (Cheese Base):

Ingredients

3 cups Vitacost unsalted cashews, soaked overnight

1/2 cup filtered water

1 capsule Vitacost ROOT2 Extra Strength Probiotic Vegan – 50 billion CFU

1/2 tsp. Vitacost Himalayan Fine Pink Salt

Directions

  1. In a bowl, cover the cashews with water for about 9 hours (or overnight). Drain and rinse the cashews. Set aside.
  2. In a blender, add the cashews, probiotic powder (from the capsules), and water. Blend ingredients until smooth in texture.
  3. Using two cheese clothes layered in a colander, pour the mixture into the lines colander- folding the cheesecloth on top.
  4. Place this in a warm spot to culture for roughly 24-36 hours.
  5. Serve on one big cheese board or individually with fresh fruit, dried fruit, cookies, pretzels, medjool dates, sun-dried tomato, grapes, crackers, or any of your own choices.

Herb-Coated Cheese Wheel:

Herb-Coated Cashew Cheese

Ingredients

3 tsp. fresh thyme

3 tsp. fresh rosemary

4 Tbsp. fresh parsley

1-1/2 tsp. Lemon zest, fresh

1/2 tsp Vitacost Himalayan Fine Pink Salt

Directions

  1. Roll the plain cheese into the herb mix. Allow to set in fridge after rolling to hold its shape.

Blueberry-Smash Breakfast Cheese:

Blueberry Cashew Cheese

Ingredients

4 tsp. blueberries, smashed

2 tsp. blueberries, chopped

Directions

  1. Add the smashed and chopped blueberries, mix and place into the fridge for 1-2 hours to set.

Pistachio and Sun-dried Tomato Holiday Cheese:

Pistachio and Sun-dried tomato Cashew Cheese

Ingredients

1/2 cup pistachio, chopped to coat

1/4 cup sun-dried tomato, to coat

1 Tbsp. fresh parsley

3 tsp. fresh thyme 

4 tsp. fresh rosemary

1/2 tsp. garlic, minced

Directions

  1. Mix herbs into the cheese, refrigerate for 1-2 hours to set in mold. Roll in pistachio and sun-dried tomato.

Pecan-Chip Cookie “Cheesecake” Wheel with Strawberry Jam:

Cheesecake Cashew Cheese

Ingredients

1/2 cup maple syrup

1/4 cup Simple Mills pecan cookies, crumbled

3 tsp. Vitacost chocolate chips

3 tsp. strawberry jam, on side

Directions

  1. Combine plain cheese base, chocolate chips, maple syrup and mix until well combined. Place in the fridge as well for 1-2 hours to set shape. Remove and roll in fine cookie crumbles.

Chef’s tip: Feel free to use the plain cheese as you wish to create a flavor of your liking!

Carrot Cake with “Cream Cheese” Frosting

Carrot Cake

Carrot Cake

This spiced cake with organic carrots and a non-dairy cream cheese frosting is perfect for any occasion or birthday celebration! Feel free to make this cake gluten-free by using TigerNut flour- its’ a great option for those with nut allergies. I do have to warn you that this cake is effortless to make and dangerously moist so be careful when you taste how flavorful it is. Thanks to this recipe that I get to share with you all, you too will be able to enjoy this amazing dessert!

Carrot Cake

Ingredients

Cake:

2 cups organic flour

2 tsp. baking powder

1 tsp. baking soda

1-1/2 tsp. ground cinnamon

1/2 tsp. ground ginger

1/4 tsp. nutmeg

1/2 tsp. Vitacost Himalayan Fine Pink Salt

4 Tbsp. Bob’s Red Mill Egg Replacer + 8 Tbsp. filtered water

1 cup organic sugar

1 cup Vitacost brown sugar

3/4 cup avocado oil

1/4 cup apple sauce

1/4 cup crushed pineapple

1 tsp. vanilla extract

3 cups shredded carrots

Cream Cheese Frosting:

1 (8 oz) Mykonos Cream cheese 

1/2 cup vegan butter, softened

2 cups Vitacost powdered sugar 

1 tsp. vanilla extract

Directions 

Cake:

  1. Preheat oven to 350 degrees F.
  2. In a mixing bowl, combine white and brown sugar with oil and Egg Replacer. Mix until well combined and then add the apple sauce, crushed pineapple, and vanilla. 
  3. Then add the nutmeg, cinnamon, ginger, salt, baking soda, baking powder, and the flour. Once mixed, add the carrots and fold them in. 
  4. In a greased cake pan, pour the cake batter in and place in the preheated oven for 30-35 minutes or until the top is nice and golden brown. 

Frosting:

  1. In a bowl combine all ingredients and beat until frosting has formed. 
  2. Spread evenly over the cake once it has cooled and top with walnuts. 

Chef’s tip: If you would like, you can add 1/2 cup raisins to the batter at the end, mixing it in.

Homemade Ranch Dressing

Homemade Ranch Dressing

Homemade Ranch Dressing

Ranch dressing is usually made with buttermilk or other dairy ingredients, but not this time! My homemade ranch dressing is made with fresh parsley, dill and other plant-based ingredients. It’s really the best tasting ranch I’ve had, and better than anything store-bought. Other than it being super easy to make, the benefit of making it at home are having no added chemicals or preservatives that would otherwise been added. This dressing is great to drizzle on any salad or even as a dip for vegetables, so be sure to keep this stocked up in your fridge!

Homemade Ranch Dressing

Yields 2-3 servings

Ranch Dressing:

1 cup vegan mayonnaise

1/2 cup vegan sour cream, (optional)

1/4 cup cashew milk

1 tsp. garlic powder

1/4 tsp. onion powder

1/4 tsp. Vitacost Himalayan Fine Pink Salt

1/8 tsp. ground black pepper

1 Tbsp. apple cider vinegar

2 tsp. fresh parsley

1/2 tsp. fresh dill

1/2 tsp. chives

1-1/2 tsp. lemon juice, freshly squeezed

Directions

  1. In your blender, add all of the dressing ingredients (except parsley, dill, and chives) and blend until well mixed. Mix in the herbs and set in the refrigerator to allow the flavors to meld together.

Chef’s tip: Feel free to add some cayenne pepper or some sriracha to make this ranch spicy!

Cashew Broccoli

Cashew Broccoli

Cashew Broccoli

You don’t need to call for take-out to enjoy this vegetable wok of goodness tonight. I promise this recipe will be a huge hit at your next family dinner! Cashews and broccoli are some of my favorite things to eat (and they’re really healthy too!), so when you put those together for this classic dish, your taste buds won’t know what hit them. Paired with some steamed rice or quinoa, you will have yourself a hearty and nutritious packed meal for any occasion!

Cashew Broccoli

Yields 2 servings

Ingredients

1/2 cup unsalted raw cashews

1 broccoli head, florets head only

1 small onion, chopped

2 carrots, chopped

1 celery stalk, diced

1-2 Tbsp. vegetable broth

Cashew sauce:

1/2 cup low sodium soy sauce

1 Tbsp. rice vinegar

1 Tbsp. agave 

1/4 cup saki, (optional)

1/2 tsp. ginger

1 garlic clove

1/4 cup filtered water

3 tsp. cornstarch

1/8 cup green onions

Cashew Broccoli

Directions

  1. In a skillet, add a little bit of vegetable broth and turn to medium-high heat. Add the onions and sauté for 3-5 minutes. Then add the broccoli, celery, and carrots, adding more vegetable broth as needed so it does not stick. Sauté for roughly 5 minutes longer and then add the garlic and ginger. 
  2. Turn to high heat and deglaze with saki. Once alcohol has cooked off, add the soy sauce, rice vinegar, agave.
  3. Mix together cornstarch and water and pour into the pan. Allow sauce to thicken and remove from heat.
  4. Toss in cashews and green onions.
  5. Serve with white rice or noodles. 


Chef’s tip: If you would like to use oil instead of vegetable broth, use 1 Tbsp. avocado oil or sesame oil.

Another “Neat” Taco

Another Neat Taco

Another Neat Taco

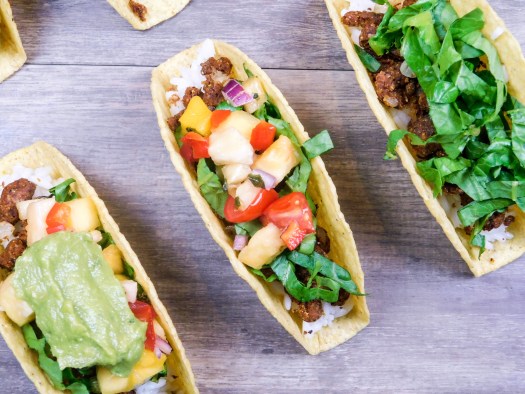
Fast and healthy meals don’t always have to be made from scratch, but that doesn’t mean they need to be completely store bought either. This taco “meat” is really neat! (pun intended) Why you may be wondering? Because it has all of the flavor and ingredients inside, all you need to do is add water and give it a good ol’ mix and voila- you are ready to go. You will be delighted to find out how great this Mexican style taco neat “meat” tastes! Don’t forget to kick it up a notch by adding a bunch of plant-based toppings like lettuce, guacamole, and mango salsa!

Another Neat Taco

Yields 8 tacos

Ingredients 

1 pouch Neat Foods Mexican-Style

1/2 cup water

1 small onion, diced

1 Tbsp. avocado oil

1/2 cup cooked white rice

1/4 tsp. Vitacost Himalayan Fine Pink Salt

1/2 lime, squeezed 

1 tsp. fresh cilantro, finely chopped

Toppings:

Guacamole

Mango salsa

Lettuce

Directions

  1. Using a bowl, pour the contents of the pouch into a bowl and mix with water. Set aside.
  2. Heat a sauté pan on medium-high heat. Add the oil and onion, stirring occasionally for 3-4 minutes.
  3. Add the neat Mexican style “meat” to the pan, breaking it up into crumbles as if browns, roughly 10-12 minutes.
  4. In another bowl, add the rice, minced cilantro, salt, and lime juice and mix (season to taste).
  5. In either a hard or soft shell, place some of the rice, followed by taco meat, lettuce, salsa, and guacamole (or with whatever toppings you’d like). 


Chef’s tip: if you would like to spice up the neat Mexican style mix, add 1-2 tsp. siracha.