Vegan Crab Cakes

Vegan Crab Cakes - The Vegan Rhino

Vegan Crab Cakes - The Vegan Rhino

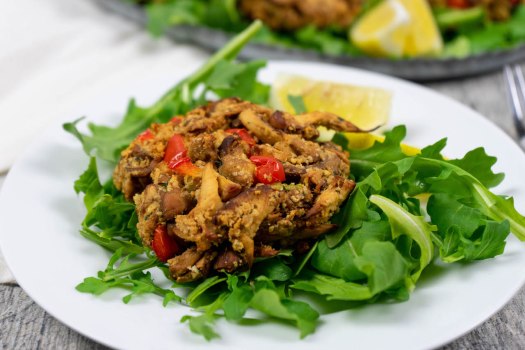
Oyster Mushroom Vegan Crab Cakes are one of my favorite alternative dishes. Seasoned with old bay and other classic ingredients, these crabless cakes remind me that plant-based dishes don’t have to lack flavor or be boring. It’s perfect as a side dish or between a freshly toasted buttered bun. No matter which way you pick, this dish is a must try!

 Vegan Crab Cakes - The Vegan Rhino

Yield: 6 crabless cakes

Ingredients

3 Tbsp. plant-based mayonnaise

1 1/2 tsp. Dijon mustard

1 1/2 tsp. Worcestershire sauce

1 tsp. lemon juice

1 Tbsp. melted plant-based butter

12 oz. lions mane mushrooms

1/4 cup celery, finely diced

1/4 cup red bell pepper, minced

1 Tbsp. Bob’s Red Mill Egg Replacer + 2 Tbsp. water, mixed

2/3 cup panko bread crumbs

1 Tbsp. parsley, minced

1 1/4 tsp. Old Bay seasoning

1/8 tsp. Himalayan pink salt


Directions

  1. In a small bowl, mix together mayonnaise, mustard, Worcestershire sauce, lemon juice, and melted butter. Set aside.
  2. Rinse lions mane mushrooms and squeeze any remaining water. Dice into small chunky pieces.
  3. In a large bowl, add mushrooms, sauce mixture from above, celery, bell pepper, egg replacer, bread crumbs, parsley, old bay, salt, and fold until well combined. Cover and refrigerate for 30 minutes.
  4. Preheat oven to 450 degrees F. Line a baking sheet with parchment paper.
  5. Remove crabless mixture from refrigerator and scoop into 6 mounds. Bake for 12-14 minutes or until edges are golden brown.
  6. Serve immedietly with lemon wedges.

Chef’s tip: To fry, heat an inch of oil on medium-high heat. Pan fry each side until golden brown, 2-5 minutes per side.

Vegan Tiramisu

Pic

Growing up in an Italian family, I learned at a young age that tiramisu was the dessert of the gods (OK, that might be a little extreme – but it’s pretty darn heavenly!). This traditional treat, which is layered with brandy-espresso-soaked ladyfinger biscuits, is topped with a custard mascarpone whipped cream. Finally, all this deliciousness is dusted with cocoa powder – trust me, it goes great with a cup of coffee! While the classic recipe calls for eggs and dairy, this plant-based version uses almond- and coconut-based ingredients so you certainly won’t miss out on any of the authentic, bold and delicious flavors. Are you ready to start? ‘Cause I am!

Pic

Yields servings

Ingredients

Custard:

1-1/2 cups plain almond milk

2 Tbsp. cornstarch

1/3 cup organic maple syrup

1 tsp. vanilla extract

Other:

1/2 cup brandy

1-1/2 cup espresso coffee

1/4 cup cocoa powder

Mascarpone:

2 cups Vitacost unsalted cashews, soaked overnight

1/2 cup water

pinch of salt

3 Tbsp. dairy-free unflavored yogurt

Ladyfinger Biscuits: (30-32 ladyfingers)

3/4 cup butter

1-1/4 cup organic sugar

4 Tbsp. Bob’s Red Mill Egg Replacer + 8 Tbsp. filtered water, mixed

1 cup plain almond milk

2 tsp. vanilla extract 

2-1/2 cup King Arthur organic flour

1/4 tsp. Vitacost Himalayan Fine Pink Salt

Whipped Cream:

1-3/4 cup heavy coconut cream

2 Tbsp. organic sugar

Directions 

Ladyfingers:

  1. In a KitchenAid stand mixer, cream together the sugar and butter until fluffy, roughly 3-5 minutes on a high speed.
  2. Slowly add the egg replacer you’ve mixed, the almond milk, and vanilla. Sift in the flour and pinch of salt. Mix until dough has formed.
  3. Preheat oven to 350 degrees F.
  4. In a delectoval pan, dispense roughly 3 Tbsp. of the batter evenly and bake for 15 minutes. When they are done baking, they should be springy to the touch.
  5. Remove from the oven and allow to cool completely.

Whipped Cream:

  1. In a stand mixer, whisk together the coconut cream until medium peaks are formed. Slowly add the sugar and turn speed to high for 2-3 minutes.

Mascarpone:

  1. Using a handheld immersion blender, combine all of the ingredients for the mascarpone and pulse until smooth. Add the whipped cream to the mascarpone and fold together.

Custard:

  1. Next, using a sauce pot, bring the almond milk and maple syrup to a slight boil. Sprinkle the cornstarch and whisk until custard thickens, roughly 2-3 minutes. Remove from heat, let cool and add the vanilla extract.
  2. Pour the mascarpone whipped cream into the custard and fold together until smooth (don’t over mix or it will become grainy in texture).

Assembling:

  1. In a bowl, mix together the brandy and espresso. Dip each lady finger into the espresso mixture.
  2. Place 2 rows of 5 ladyfingers into a layer on a serving dish lined with plastic wrap.
  3. Top with custard mixture and repeat previous step 2 more times with the ladyfingers. Spread remaining custard on top and dust with cocoa powder.

Chef’s tip: Instead of using brandy, you can use Baileys Almande Almondmilk Liqueur. 

Sufganiyot

Sufganiyot - The Vegan Rhino

Sufganiyot - The Vegan Rhino   

Thinking back to my childhood when my grandmother used to make these  Sufganiyot or Jelly Donuts for us. They were always such a treat during the Jewish holidays. Filled with a strawberry jelly, this fried donut is the ultimate dessert. Although this dessert is most commonly found during Hanukkah, you can enjoy them anytime of the year!

Sufganiyot - The Vegan Rhino

Yield: 10 donuts


Ingredients

180 mL (3/4 cup) warm water, about 100 degrees F.

2 tsp. active dry yeast

2 1/2 cups organic all-purpose flour

1/4 cup + 1 tsp. organic cane sugar

3/4 tsp. Himalayan pink salt

2 Tbsp. Bobs Red Mill Egg Replacer + 4 Tbsp. water, mixed

2 Tbsp. plant-based butter, room temperature

3 cups vegetable oil, for frying

1/2 cup jam of choice

Sufganiyot - The Vegan Rhino


Directions

  1. In a stand mixer, combine water and yeast and let sit until foamy, about 8 minutes. Add sugar, salt, and 1 cup flour on medium speed. Mix in egg replacer and slowly add remaining flour. Once flour is almost mixed, add butter and knead by hand in bowl until incorporated.
  2. Transfer dough to a lightly greased bowl and cover with wrap tightly. Allow dough to rise for 1 1/2 hours or until it’s doubled in size.
  3. On lightly floured surface, roll dough into 1/4”-in. thickness. Using a 2 1/2-in. round cutter, cut 10 rounds in total. Cover with a dish cloth or wrap and let rise for 20 minutes.
  4. In a saucepan, heat oil to 350 degrees F. Fry each donut for ~45 seconds on each side until golden brown. Remove and transfer to a wire wrack with paper towel below. Roll donuts in sugar to coat.
  5. Fill pastry bag with jam or jelly and make a hole in the side of the donuts with a toothpick. Fill about 1 1/2 to 2 teaspoons with jam or jelly.

Chef’s tip: If you plan on making these in advance, refrigerate dough overnight instead of the 1 1/2 hours.


Sufganiyot - The Vegan Rhino

How To Make Herb-Infused Oils For Culinary Use

Herbed Oil DIY Gift
Rosemary Oil DIY Gift
Photo by: Earth to Kathy


From homemade infused oils to enhance your culinary foods to DIY gift ideas, this step-by-step guide will show you what you need to know.

Herbs are known throughout history for their incredible health benefits. With high-quality oil and dried herbs, you can create your own DIY infused oil perfect for culinary use. They also make for a great gift. Let’s make some healthy infused oils that you can add to your daily cooking for a flavor boost.

What you’ll need

  1. Dried or fresh herbs

There are countless numbers of herbs that you can use when infusing oils, depending on your needs. Always opt for organic herbs when infusing oil and drying your herbs—wilting fresh herbs on your counter for 10-12 hours before bottling will reduce mold and your oil from going rancid. Never use herbs that show any signs of decay.

Common herbs to use:

  • Basil
  • Rosemary
  • Bay leaves
  • Tarragon
  • Savory
  • Marjoram
  • Thyme
  • Mint
  • Oregano
  • Peppermint
  • Citrus peel

Herbed Oil DIY Gift

  1. Premium grade oil

When choosing which oil to use, you should go for lighter olive oil or one of the below choices:

  1. (2) Glass containers with lids

It’s highly important to sterilize your jars before using them. You can either put them in the dishwasher using a normal rinse cycle or in your oven on a newspaper at 275 degrees Fahrenheit for 20 minutes. This will help kill any lingering bacteria that may create unwanted mold in your oil. For storage, an amber glass can block light and may help keep your infused oil lasting longer.

  1. Cheesecloth or fine mesh strainer

Two methods: quick vs. sun method

Ingredients

Dried or fresh herbs of choice

Light cooking oil of choice

Directions

  1. Remove any soil on the herbs and check for any insects. Wash your herbs by rinsing them off and drying them. For fresh herbs, wilt them for roughly 12 hours to remove excess water. Extra water will cause the oil to go rancid during the infusion.
  2. Sterilize your jars and set them aside.
  3. Take dried herbs and press slightly with a rolling pin to release oils, also known as bruising.

Quick Method

  1. Follow directions 1 to 3.
  2. In a pot on medium heat, bring oil to 100 degrees Fahrenheit. Add dried herbs and allow them to infuse for 1-2 hours. Remove from heat and allow to cool completely. Pour oil through cheesecloth or fine mesh strainer into a sterilized jar. Cover with lid and keep out of direct sunlight for storage.

Sun Method

  1. Follow directions 1 to 3.
  2. Fill jar with herbs so you have 2 inches remaining above herbs to cover with oil.
  3. Pour oil over herbs, so you have about an inch of oil covering.
  4. Set in a sunny area for 2 to 3 weeks, removing any herbs that may float to the top. Make sure herbs are fully submerged and remove any floating herbs that may cause mold.
  5. Strain oil through cheesecloth or fine mesh strainer into a sterilized jar. Cover with lid and store in a cool dark place.

If you are going to give these as a gift, make sure to provide a card with the below note.

Note: Homemade infused oils will not keep as long. Once you begin using it, make sure to use it within 2-3 months. I suggest putting a “use by” date or label so you can remember the infusion date.

This DIY infused oil is a great way to enhance your daily cooking and the perfect gift idea made with love. Depending on the herbs you use, the combinations can be endless, so feel free to mix herbs and have fun with this.

The Benefits of Using Garden Sheers

Gardening Sheers Pic

5 Reasons to use Hand Sheers

A primer or hand sheer are essential to any home grower’s toolbox. They help remove any unwanted old branches and flowers. If you ask any gardener what their best friend would be, they would say “hand sheers.”

Having the right tools in any garden is the equivalent to having good pots and pans or knives in the kitchen. Although this is not a sponsored post, I really enjoy this tool and want to share why. It was gifted to me back in 2017, and I love using it.

Below I’m going to highlight five important reasons why having hand sheers for your vegetable and fruit cultivation is smart.

Garden Sheers - Tomatoes

Easy on the wrists

Having the right tool will help alleviate any unwanted stress or pressure brought on by removing your food from the vines.

It’s crucial that you protect yourself (yes even while working in your garden) to ensure that you do not give yourself any unwanted discomfort that could later turn into a more significant issue (i.e., carpal tunnel).

Garden Sheers - Zucchini

Different pruners for different jobs

Just like in any kitchen where there are different knives or spoons or spatulas for various tasks, there are also different types of sheers. The one that I currently use is a gardening pruning shear, and it works wonders!

I have used it on homegrown red peppers, tomatoes, okra, kale, herbs, aloe plant, and trimming of my lavender. I highly suggest investing in at least one high-quality garden tool to help you work more efficiently.


Grow healthier plants

When you trim or cut plants at the right place (with a clean cut) it is beneficial for the survival of the plant. I enjoy these pruners because of the shape of the scissors. It allows you to cut right near the bell of the plant which makes it a lot easier on you!

Garden Sheers - Plants

Minimize fatigue

When you have a small or medium garden, it can be quite laborsome when you have to trim all of your plants or cut all the veggies and herbs for a harvest.

Having a lightweight tool that you can use to quickly cut through whatever it is you need for the time being is very helpful. Plus, you won’t ruin your plants since you aren’t ripping them off the vine.


Faster harvests

Having the right tool for the job speeds up your cultivating process. Instead of using a knife or other device that could potentially harm the plant, using a sharp “scissor” that works like a charm will be hugely beneficial.


I hope that in whatever you chose, your garden grows bountiful and that you have a fun time learning about all the different things you can grow.

Learning how to grow our own foods is very simple and is a great way to save some money. Nothing beats fresh food that comes from a familiar place — your own backyard.

Garden Sheers- Food

Hot Cocoa Bombs

Vegan Hot Cocoa Bombs


Try these vegan hot cocoa bombs drizzled in plant-based white chocolate and filled with hot cocoa mix and mini marshmallows. Whether you’re plant-based or not, you can still enjoy all the goodies during the holidays. My favorite thing about hot cocoa bombs are how easy they are to make and store for later use. Who is ready to tackle the cocoa bombs?!

Yield: 5 hot cocoa bombs

Ingredients

12 oz. vegan semi-sweet chocolate

4 Tbsp. hot cocoa mix (recipe below)

4 Tbsp. plant-based mini marshmallows

3 Tbsp. vegan white chocolate


Hot cocoa mix

1 Tbsp. soy mylk powder

2 Tbsp. powdered sugar

1 Tbsp. cocoa powder


Extra

8 oz. oat mylk, per glass, scolding hot


Directions

  1. In a small bowl, combine cocoa mix and set aside. 
  2. In saucepot, full 1/4 way with water and bring to simmer. In a glass bowl, add chocolate and set on pot. Melt chocolate, stirring frequently.
  3. Place one tablespoon melted chocolate in 10 mold cavities. Brush chocolate on sides in even layer. Set in refrigerator for 5 minutes. Take out of refrigerator and gently remove chocolate from molds. Fill 5 halves with one tablespoon hot cocoa mix and mini marshmallows. To seal, press the other chocolate half on a hot pan and stick it to the bottom portion.
  4. Melt chocolate the same as before or in a piping bag submerged in hot water. Place melted chocolate in a piping bag and cut a small hole st the tip. Drizzle on top of hot cocoa bombs and place in refrigerator to set.
  5. Place cocoa bomb in mug and pour hot oat mylk over to serve.


Chef’s tip: Store for up to 1 week in airtight container. Keep in a cool spot.

Fried Pickles

Fried Pickles - The Vegan Rhino

Fried Pickles - The Vegan Rhino

Serve these fried pickles as an appetizer or side dish at dinner and watch them disappear! Fried pickles have an awesome flavor combination that when fried, are simply divine. Although I don’t eat too much fried foods, these in my opinion are well worth it!

Fried Pickles - The Vegan Rhino

Yield: roughly 45 pickles, 1 cup sauce

Ingredients

1/2 cup + 2 Tbsp. organic all-purpose flour

1 tsp. Gustus Vitae Greek seasoning

1 1/2 tsp. garlic powder

1/4 tsp. Himalayan pink salt

1/4 tsp. white pepper

1/4 tsp. paprika

3/4 cup water

1 Tbsp. hot sauce

16 oz. dill pickles, sliced and drained


Southern-Style Comeback Sauce

3/4 cup plant-based mayonnaise

3 Tbsp. ketchup

1-3 Tbsp. hot sauce

1 1/2 tsp. Worcestershire sauce

3/4 tsp. Dijon mustard

3/4 tsp. garlic powder

1/4 tsp. black pepper


Directions

  1. In small bowl, stir together sauce ingredients and set aside. Drain pickles and save juice. Place pickles on a kitchen towel to dry.
  2. Preheat 2” inches oil in a pot over medium heat to 375 degrees F.
  3. In a rimmed dish, whisk together all ingredients until smooth. In small batches, add pickles to batter to coat and let excess drip off. Add pickles to oil one at a time.
  4. Fry pickles 1 1/2 minutes or until golden brown. Remove with slotted spoon and drain on kitchen towel.
  5. Serve with dipping sauce.


Chef’s tip: Make sure to dry the pickles before coating in the batter. This helps keep them crispy.

Limoncello

Lemoncello - The Vegan Rhino

Lemoncello - The Vegan Rhino

Limoncello is an Italian liquor made from the zest of lemons steeped in alcohol until the natural oils and aromatics release. The resulting liquid is combined with a simple syrup and bottled, resulting in a delicious drink to sip or drizzled over ice cream, either way you decide its delicious! This is one of those things you can enjoy year round, and makes for the perfect gourmet gift for any occasion.

Lemoncello - The Vegan Rhino

Yield roughly 2 bottles, 3 1/2 cups lemon juice

Ingredients

15 lemons, peeled

850 mL vodka

2 cups organic cane sugar or 3/4 cup monk fruit sugar

3 3/4 cups filtered water


Directions

  1. Using a vegetable peeler, peel the skin of the lemons and trim away any pith remaining on the lemon peels.
  2. In a large pitcher with the lemon peels, pour the vodka over them and cover tightly. Steep the peels in the vodka for 8 days at room temperature.
  3. In a sauce pan over medium-high heat, combine the sugar and water until it dissolves, about 3 minutes. Pour the syrup into the vodka mixture, mix, and strain into bottles. Let sit at room temperature for 14 days before storing in refrigerator until cold.
  4. Serve chilled and enjoy.


Chef’s tip: Make sure you use 100 proof and higher.

Mushroom Marsala Spaghetti

Mushroom Marsala Spaghetti - The Vegan Rhino

Mushroom Marsala Spaghetti - The Vegan Rhino

This easy to make Mushroom Marsala Sauce is a great addition to elevate plain spaghetti into a restaurant-quality dish. You could serve these mushrooms over cauliflower steaks, mashed potatoes, or whatever you’d like! For someone who grew up not enjoying mushrooms, I have to be honest, this dish rocks with a savory flavor that keeps you wanting more.

Mushroom Marsala Spaghetti - The Vegan Rhino

Yields 4 servings, roughly 1 3/4 cup sauce

Ingredients

1 lb. spaghetti, or as much as you’d like

1 Tbsp. + 1 1/2 tsp. avocado oil

1 cup shiitake mushrooms, thinly sliced 

1 cup  baby Bella mushrooms, thinly sliced

1/4 cup shallot, minced

1 Tbsp. minced garlic

1/4 tsp. Himalayan pink salt

1/8 tsp. ground black pepper

3/4 cup Marsala wine

1 1/2 cups vegetable broth

1 Tbsp. plant-based butter

1 Tbsp. fresh parsley, chopped


Directions

  1. Bring a pot of salted water to a boil. Cook pasta according to boxed instructions and drain, reserving 1/2 cup pasta water.
  2. In a skillet over medium heat, sauté the mushrooms and shallots until tender and slightly brown. Add garlic and cook unfurl fragrant. Sprinkle with flour and cook for 1-2 minutes, stirring constantly.
  3. Slowly add the Marsala wine and cook until reduced by half. Stir in vegetable stock, butter, and heat until sauce thickens. Stir in cooked pasta and slowly add pasta water,  as needed.
  4. Garnish with parsley and serve.


Chef’s tip: Using pasta water helps thicken the sauce and helps stick to the noodles.

Classic Chinese Lo Mein

Chinese Noodle Dish - The Vegan Rhino

Chinese Noodle Dish - The Vegan Rhino

This classic lo mein noodle dish is tossed together with a homemade lo mein sauce and veggies, making it a simple and delicious weekday meal. Being able to recreate dishes that you would normally buy from a restaurant is much more satisfying when you do it yourself. Since this recipe takes literally no more than 10 to 15 minutes, you’ll be eating in no time!

Chinese Noodle Dish - The Vegan Rhino

Yield 4 servings

Ingredients

8 oz. plant-based lo mein noodles

1 Tbsp. avocado oil

2 large garlic cloves, minced 

1 medium white onion, thinly sliced

1 medium red bell pepper, julienned

1 cup shredded carrots

1/2 cup green onions

1 cup bean sprouts


Lo Mein sauce

1/4 cup organic tamari sauce

1/2 tsp. rice wine vinegar

2 tsp. toasted sesame oil

2 tsp. organic raw brown agave

2 tsp. cornstarch + 2 Tbsp. water, mixed

1 Tbsp. sesame seeds, to garnish

Thinly diagonally sliced green onions, to garnish


Directions

  1. In a mason jar, combine sauce ingredients and shake until mixed. Set aside.
  2. Cook noodles according to package instructions and drain, set aside.
  3. In a skillet on medium heat, add oil and sauté garlic and onions for 5 minutes. Add bell pepper, carrots, green onion, and bean sprouts. Pour sauce around sides of pan and mix in noodles. Cook for 5 minutes and remove from heat.
  4. Serve warm garnished with sesame seeds and green onions.


Chef’s tip: This noodle dish can be served warm or cold! If serving cold, drizzle top with toasted sesame oil before serving.